Ace of Spades Has Better Reach Cod Black Ops 3
Introduction
Greetings zombie killers, and welcome to my fourth guide dedicated to the zombie map Gorod Krovi.

In this guide, i will explain you how to do various things across the map including :
- getting the Gauntlet of Siegfried
- obtaining the Dragon Strike Controller and upgrading it
- crafting the Fafnir's Shield and upgrading it
- accessing the Pack-a-Punch machine
- successfully completing the main Easter Egg of the map
- activating the secret musics
- unlocking the 4 hidden melee weapons
- a bottle of oil, a roll of toilet paper, two sponges and some raviolis
- I believe you read your shopping list too.
- Oh you are right.
- and some more excitements !
Yes the final screnshots of the main quest are glitched with a loading bar in the middle, i don't know why.
About the Main easter egg i'd say:
- Difficulty: Hard if not with a prepared team. (Hi bombs step, i'm talking to you)
- Can be done from 1h20 to 2h let's say
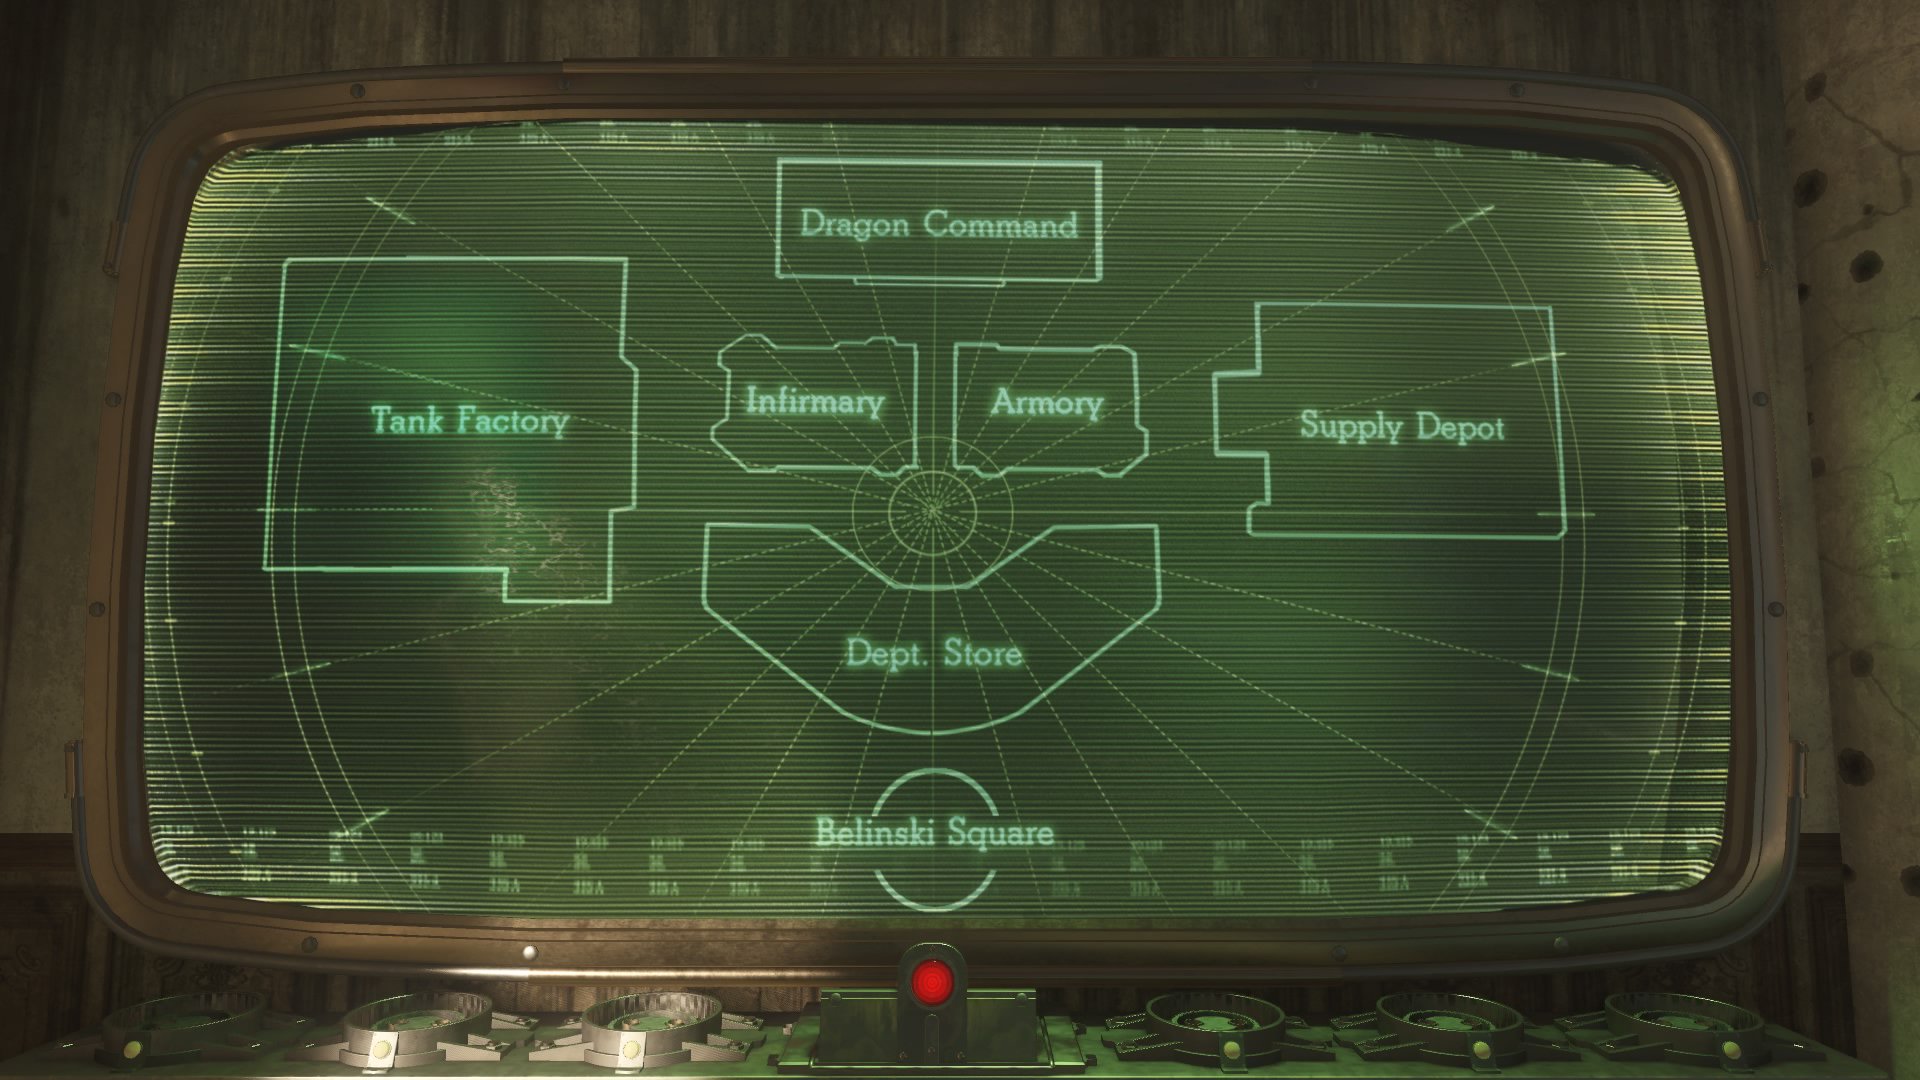
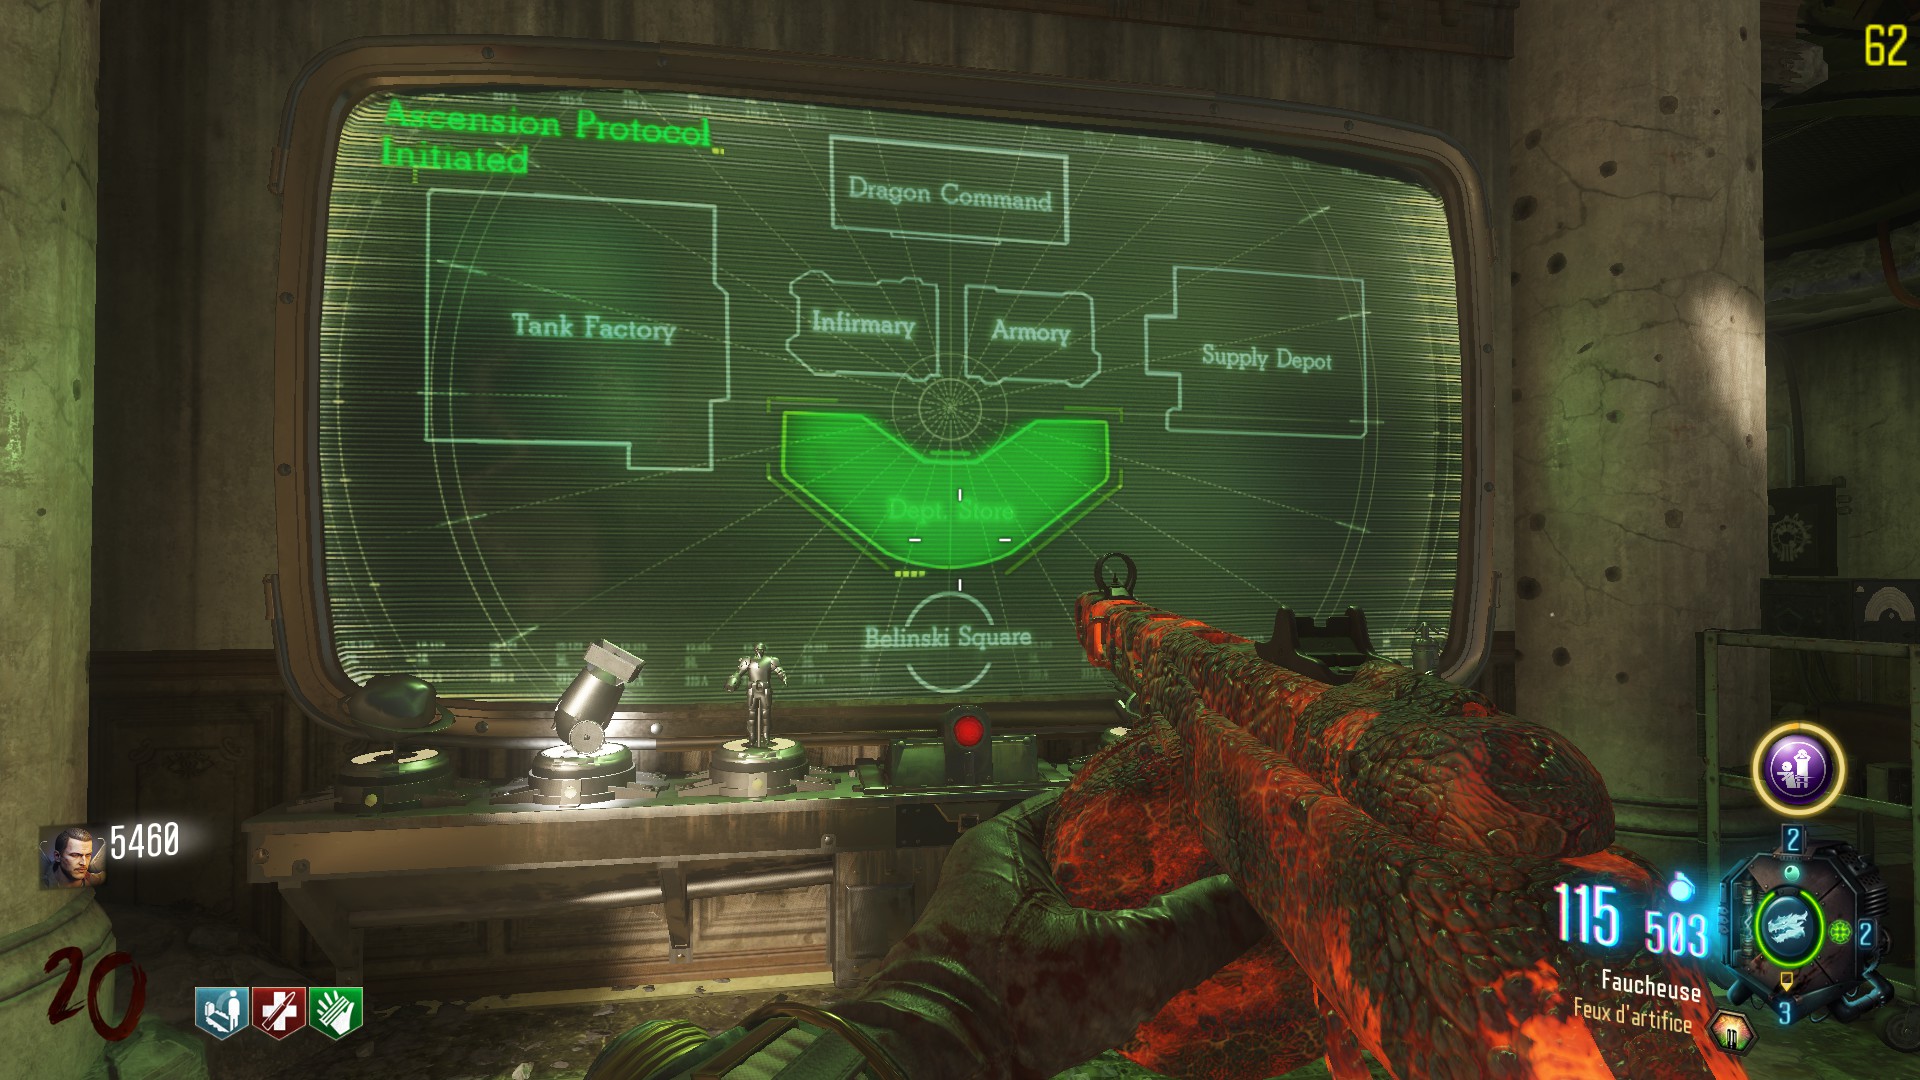
The map itself is mainly separated into 6 different locations. Departement store (Juggernog), Infirmary (Staminup), Armory, Tank factory, Supply depot and Dragon command. The spawn is labeled Belinski square.
Here we go !

Preparation - Unlocking the Pack-a-Punch
Like in every maps, you have to do a little mission to reach and unlock the mighty PaP.
First step:
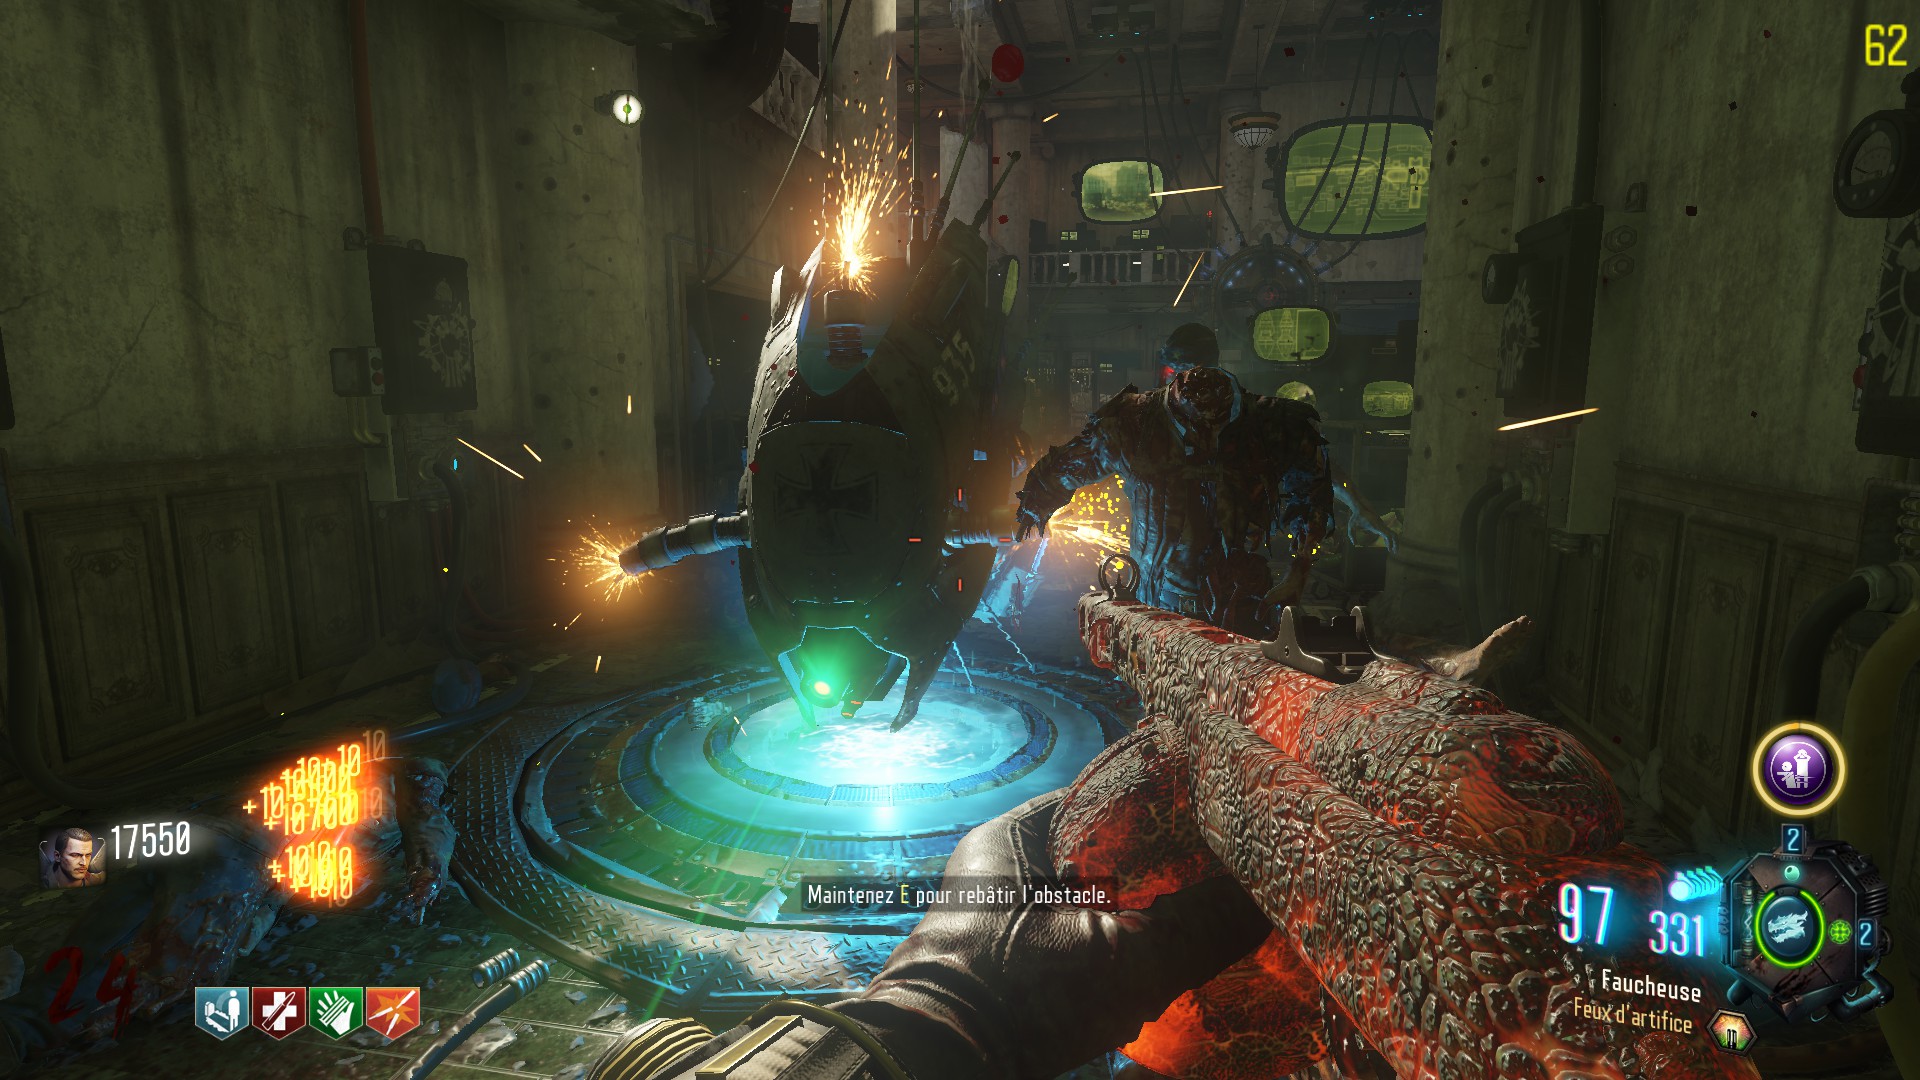
To begin with, you have to turn on the power. The switch is located in the dragon control room. It will also activate S.O.P.H.I.A, Dr.Maxxis AI.


You don't need it for the PaP, but be sure to use the green button in front of S.O.P.H.I.A, if you want to do the EE at least.
Second step:
At this moment, you can drop code cylinders on zombies, just like the seeds on ZNS, or fuses on DE. The cylinders have colors, Blue, Yellow or Red, and they are linked with three machines, that can decrypt them.

Here are the machines:
-> The machine decrypting the Blue cylinders is located in the Dragon Control room.

-> The machine decrypting the Yellow cylinders is located in the Supply Depot.

-> The machine decrypting the Red cylinders is located in the Tank Factory.
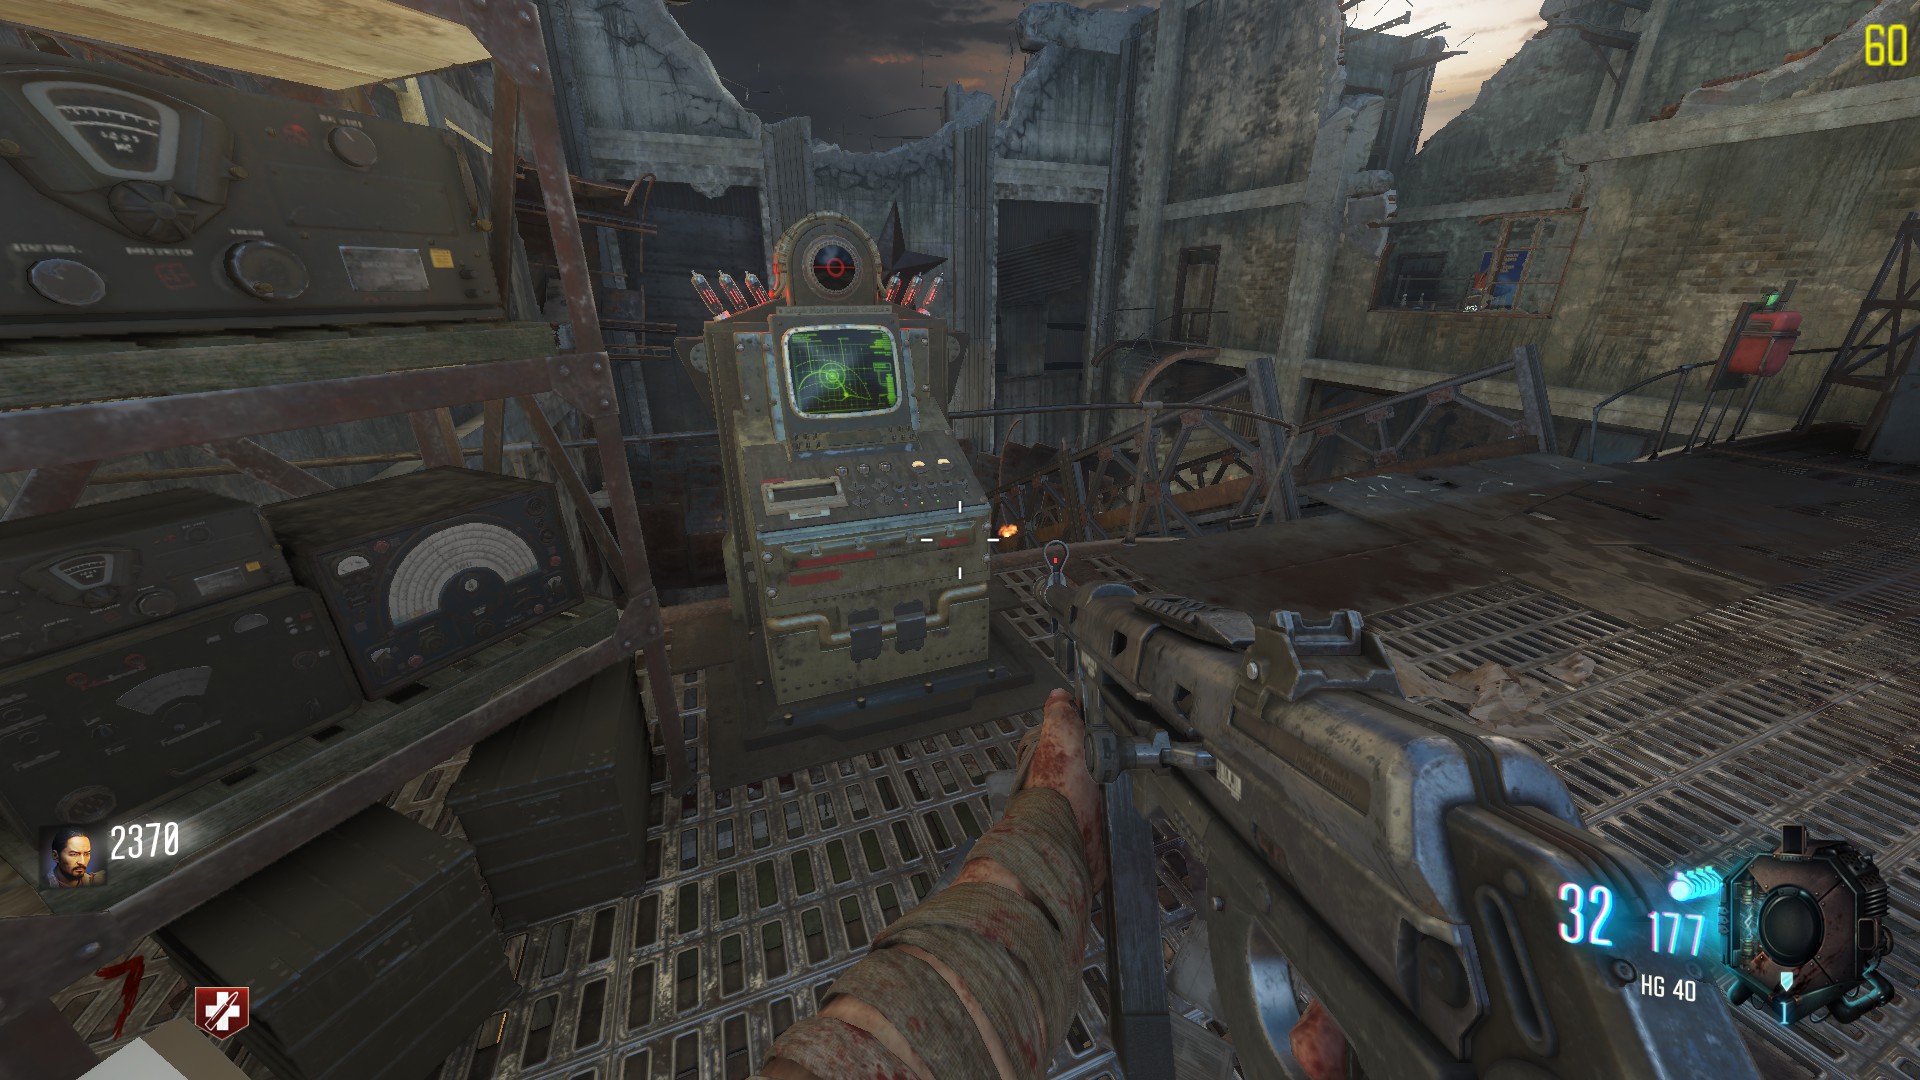
Once you placed the cylinder code in a machine, it will launch a Groph Pod somewhere on the map, you can find it by looking at the green ray of light in the sky, similarly to the blue ray of light for the mystery box.

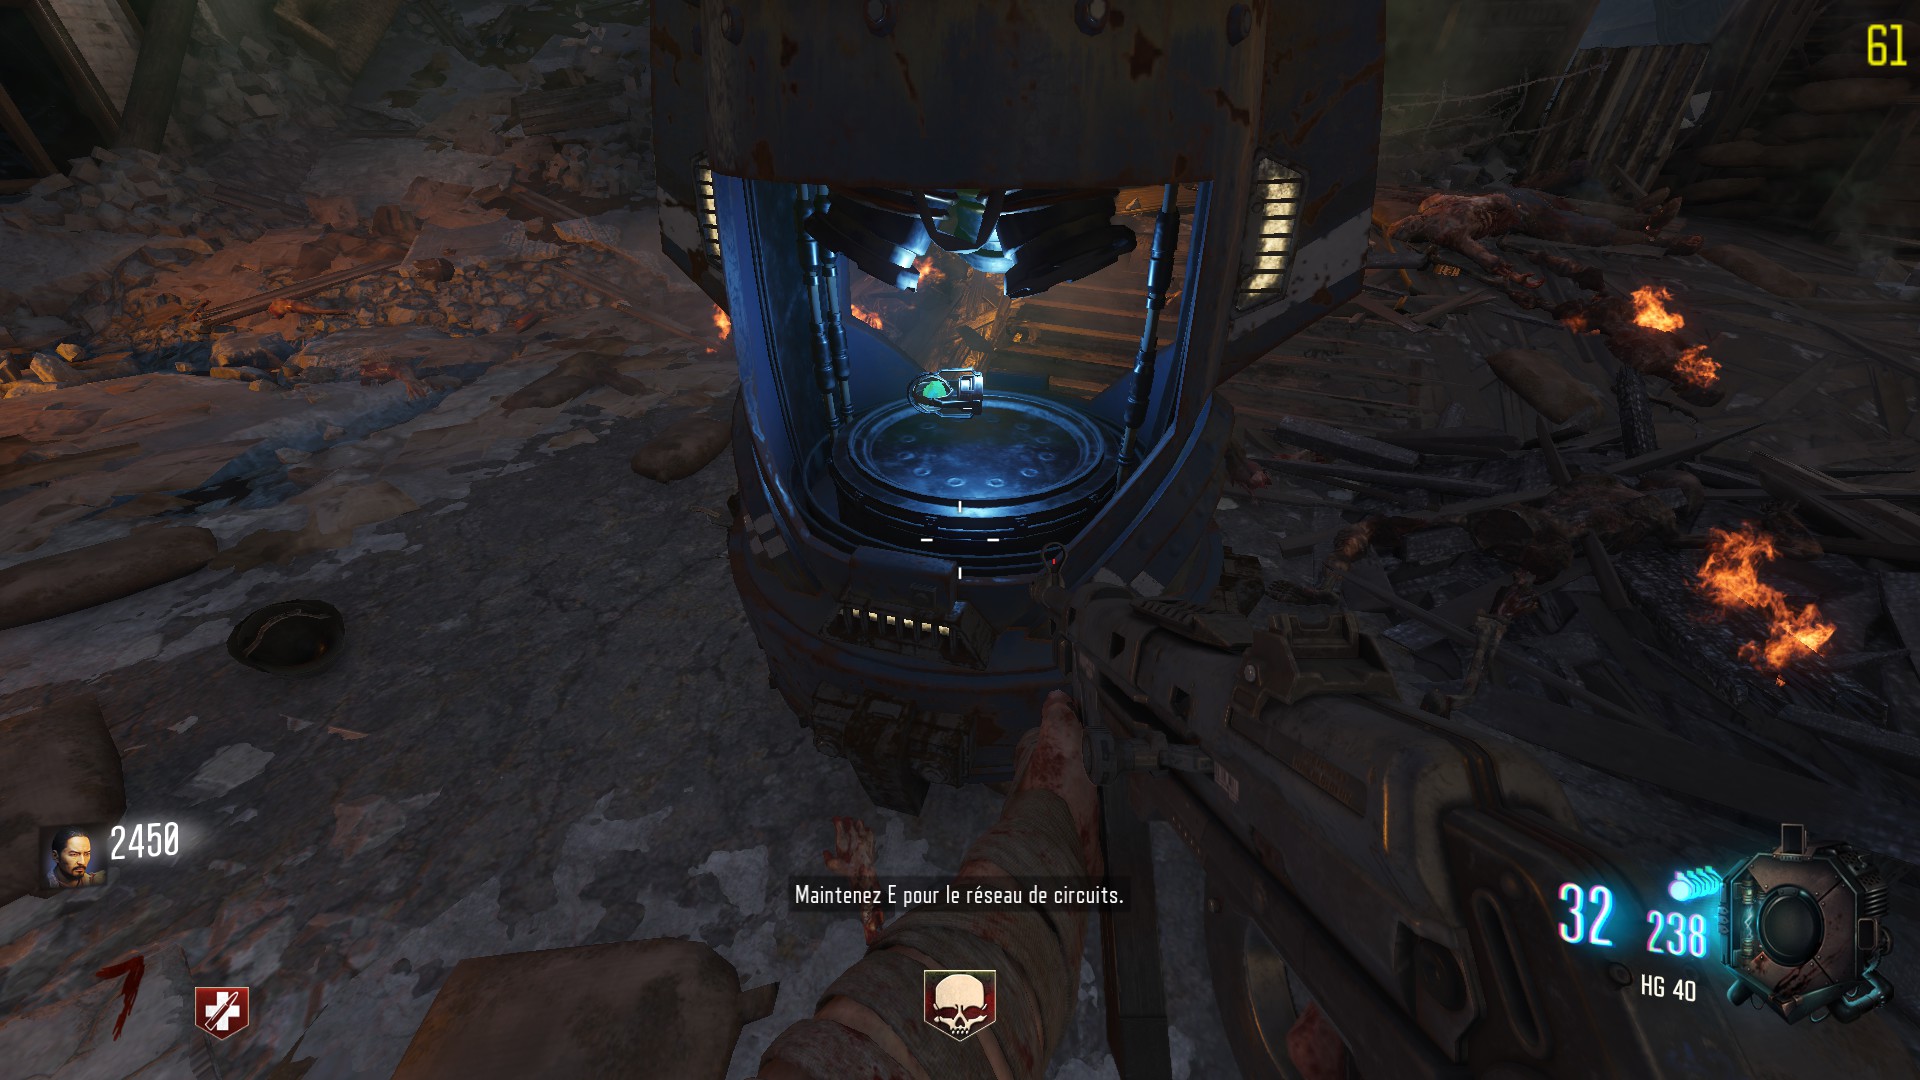
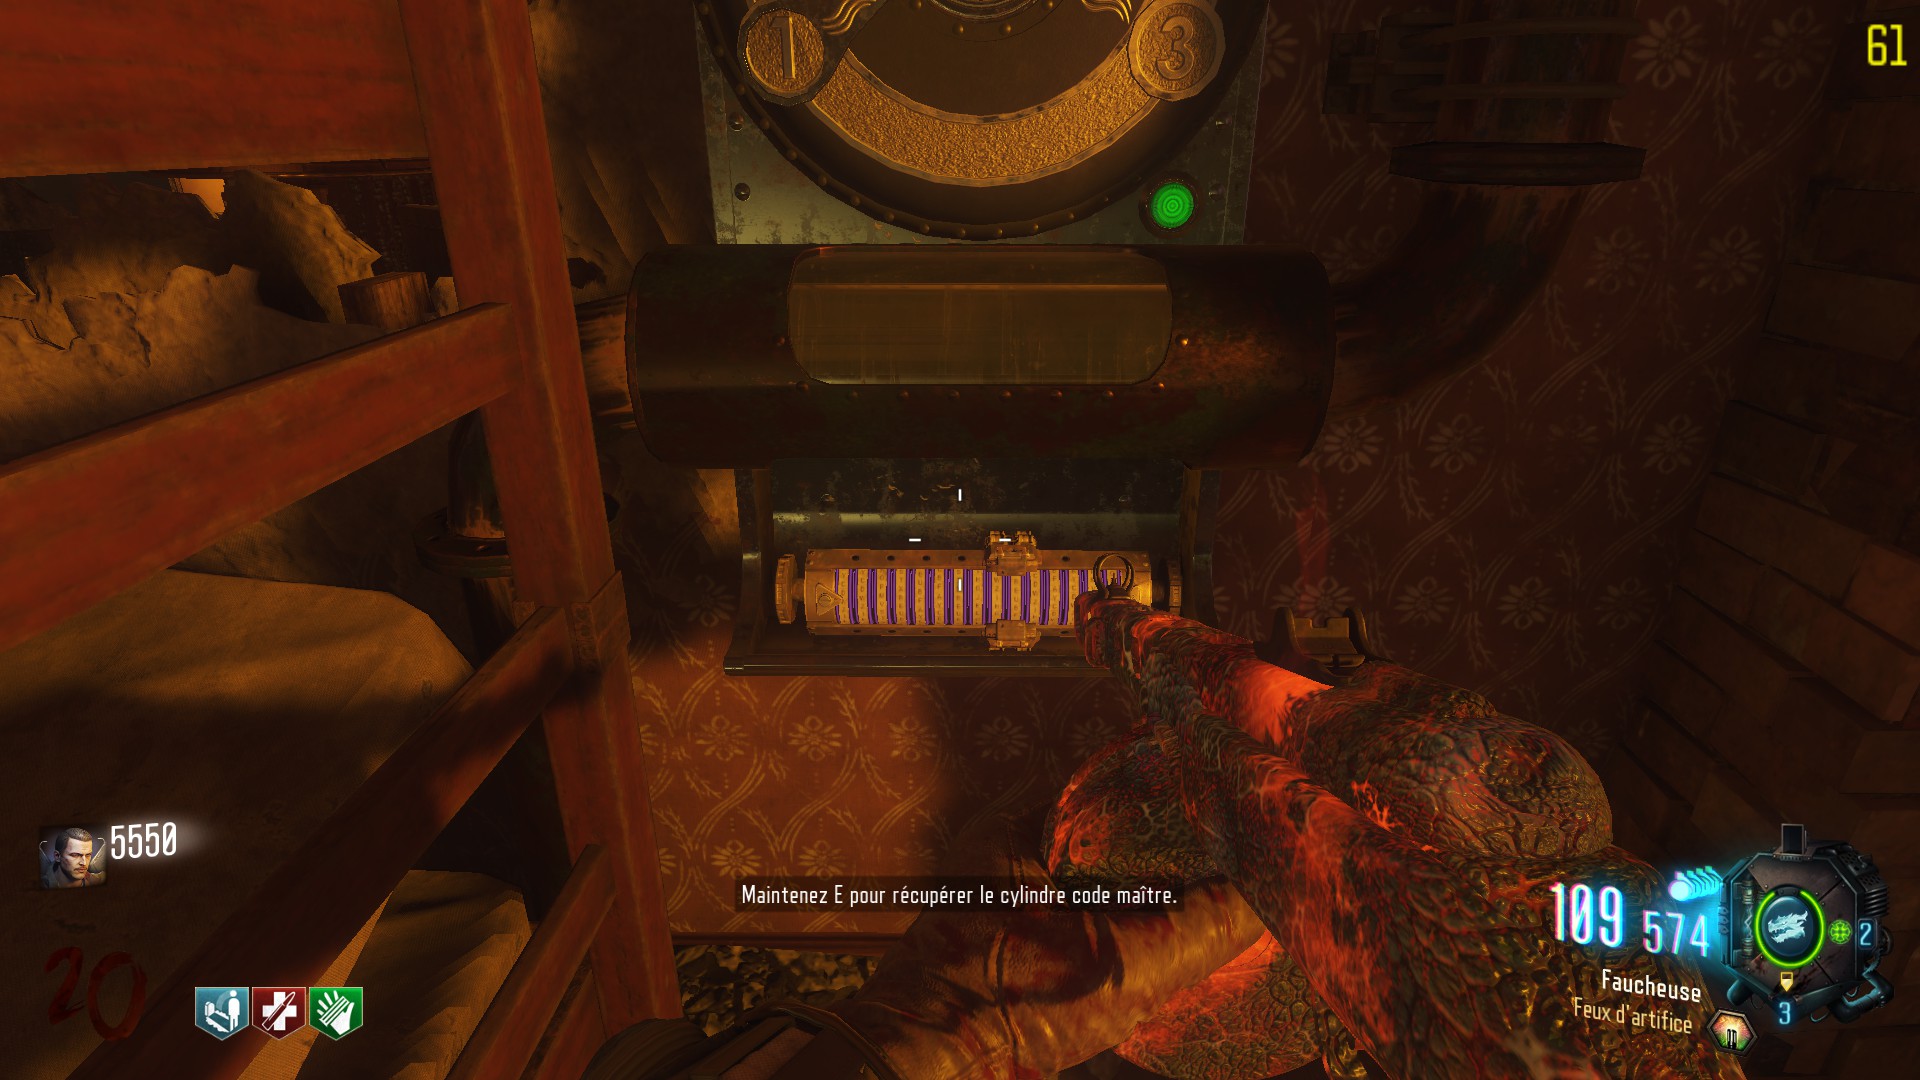
When you reached the Groph pod, you have to kill around a twenty zombies. After doing so, the pod will open up, and you will be able to pick up the Network circuit.


Third step:
Place all of your network circuit in the bunker's underground.

From now on, you can call a Dragon with the three dragon control networks. They are located near the decrypting machines.


Just pay 500 points to call the Dragon, get on board, and after a cinematic you will be in the Pack-a-Punch area. If you want to leave, just go downstairs and jump into the sewers.


Preparation - Siegfried Gauntlet
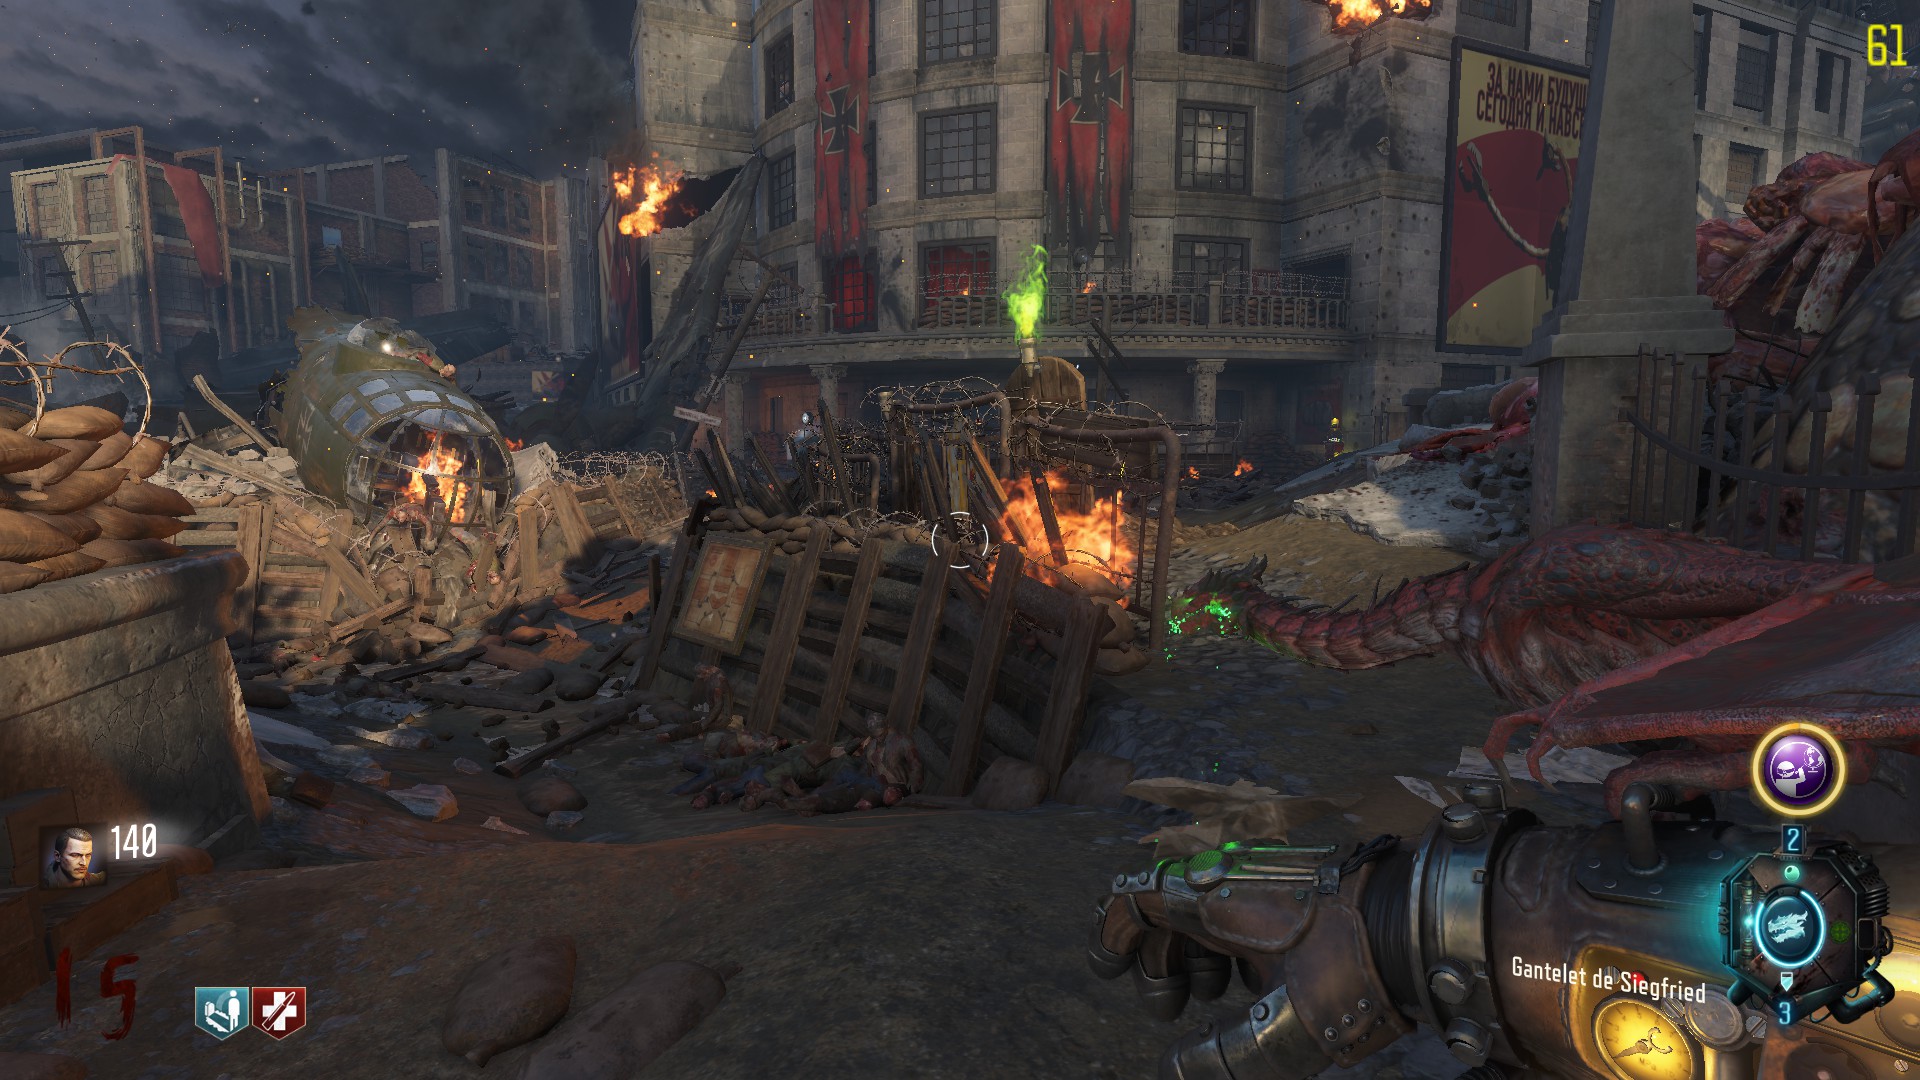
The specialist weapon that you can obtain in Gorod Krovi is called the Siegfried Gauntlet. It is a dragon that stands on your arm and can be used as a Flame-Thrower.
You can also send the dragon in a direction, he will attack zombies. While the dragon is away, you can melee punch with your gauntlet.
To obtain the gauntlet, you must complete a few challenges that are common for all players in the game.
You can check them by looking at your dedicated tomb near the spawning area. Here are the steps:

First challenge: Get the Dragon egg
Head to the Pack-a-Punch area, near the Sewers exit. Look upwards, you should be seeing a big green egg. Just shoot it down, wait a couple of seconds and grab it.


Second challenge: Warm up the egg
You have to place your egg on one of the nest on the map and warm it up, either by waiting a dragon to lit the area on fire, or throwing a Dragon strike controller on it.
The nests are located near the infirmary, the armory, in front of the power building, and near the tombs in the spawn.
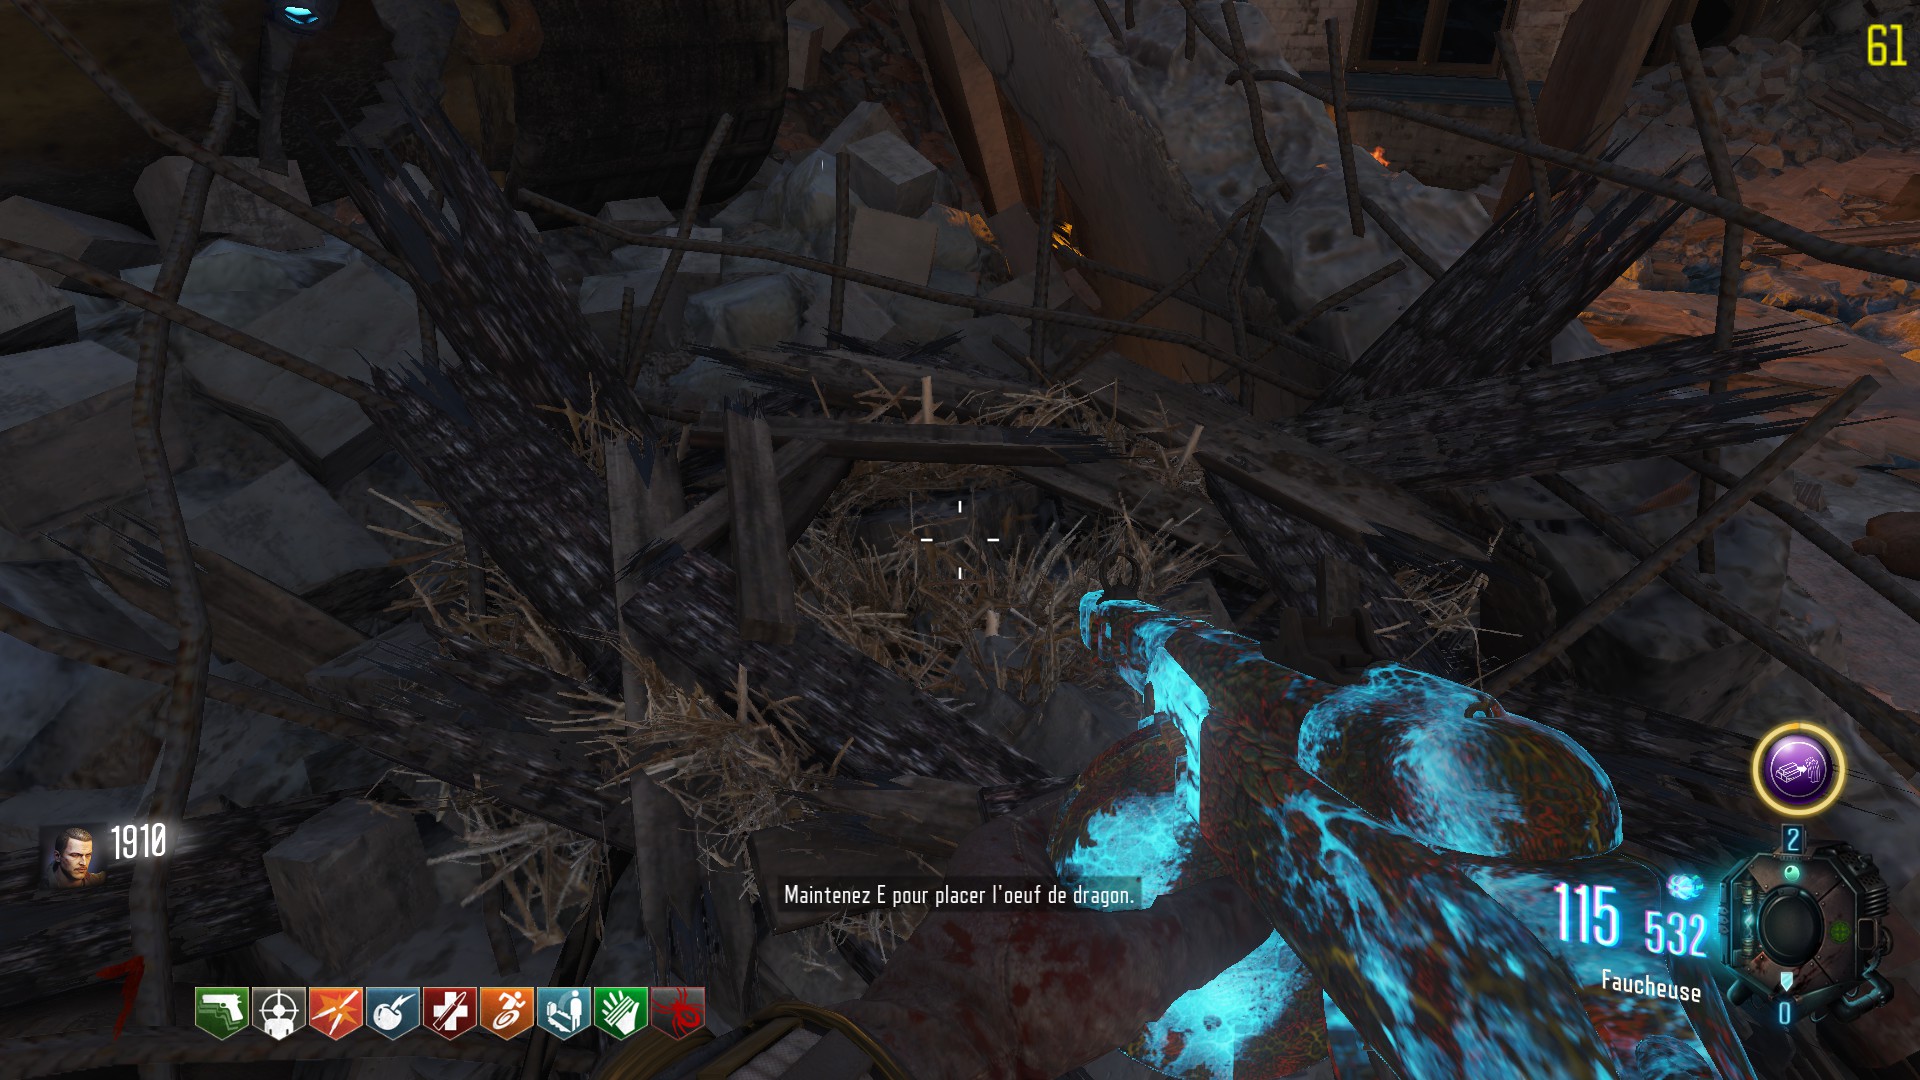

Once the egg has been warmed up, you must wait it to cool down and then, pick it up.
Just complete a full round while being away from the egg's location. If you stay around here, the dragon might come and fire up the place again.
Third challenge: Kill napalm zombies
Head to an area where a dragon can fire up the ground and kill around 15 burning zombies.
When you have completed it, nothing will play or show up. By pressing Tab, you should be seeing the egg in the bottom right, the circle around it should have increased.

Fourth challenge: Kill multiple zombies with a single bullets
You must kill multiple zombies with a single bullet, a couple of time. Use something like a Drakon or even an SVG; an insta-kill works too. Same as before, check the circle around your egg to notice your progression.
Fifth challenge: Melee kill zombies
You'll have this time to kill zombies with the Dragon shield, the bowie knife, or the default knife. Around 15 zombies will do it.
Sixth challenge: Incubate the egg
Go back to the Pack-a-Punch area and place your egg underground in the incubator. You will be locked in the room, kill a few zombies to charge the egg. Once the lockdown is over, end the round. You will afterwards be able to pick up the egg back. Now simply go back to your grave in Belinski square and accept your reward.


Preparation - Dragon strike controller + Upgrade
Dragon strike controller:
First of all, make sure you are well equipped. A ray gun mark 3 will be usefull.
Head to the pack-a-punch area, there is a console up the stairs, each player in the game must interact with the console within 10 seconds.

Doing so will release 4 rounds of zombies, manglers and valkyries and you will be stuck in the house. In the three first rounds only one window at a time will open but in the last round, the ennemies will come from all side.


If you have the mark 3 ray gun, just head upstairs and camp in the corner, or near the gobblegum machine. You will have a very easy time.
After successfully resisting the waves, head back to the console and simply pick up the dragon strike controller.

It is similar to the napalm strike in origins, it will basically call an air strike, attracting all zombies to the target location.
Upgrade the dragon strike:
The upgraded dragon strike will deal more damages and you will be able to store 2 charges instead of only one. However, you will regain only one charge with Max ammo, or beginning a new round.
To begin with, you must do 40 kills with the dragon strike. Upon completion, a loud dragon roar will be heard.
Then, you must hit a certain number of flags with the dragon strike, depending on how much players are in the game. 1 flag in solo, 2 flags for 2 players, etc ..
The flags are located outside the map:
- In the spawn near Quick-Revive: 
- In the tank factory:

- In the dragon command:

- In the supply depot:

Once done, head back to the Pack-a-Punch area and use the console again. It will start a lockdown sequence again.
The important thing is that you have to use your dragon strike controller each wave, or you'll have to restart the procedure again.
Finally, just pick up your upgraded dragon strike controller.

Main easter egg - Quest
Required stuff:
- Power activated
- S.O.P.H.I.A activated
- Siegfried's gauntlet
- Dragon strike controller
Usefull stuff:
- Upgraded dragon strike controller
- Fafnir shield / Tiamat's maw
- Pack-a-punched NX Shadow Claw (It has the same particularity as the balistic knife on Black Ops. Your shots will instantly revive fallen friends)
- Aftter-Taste, Phoenix Up, Danger closest, Perkaholic, etc ...
In this Easter egg, the crew has to kill Nikolaï 1.0, but he is stuck in his Robot that has no power anymore.
The first step, and the Second / Third / Fourth step are independant. You can either do the first or the second, third and then fourth in the beginning.
First step:
In this step, you must collect 6 trophies around the map.
- There is one trophy in the hand of the character of the right, in the sculpture on the building in front of the power, at Dragon command. It will then fall and you can pick it up.


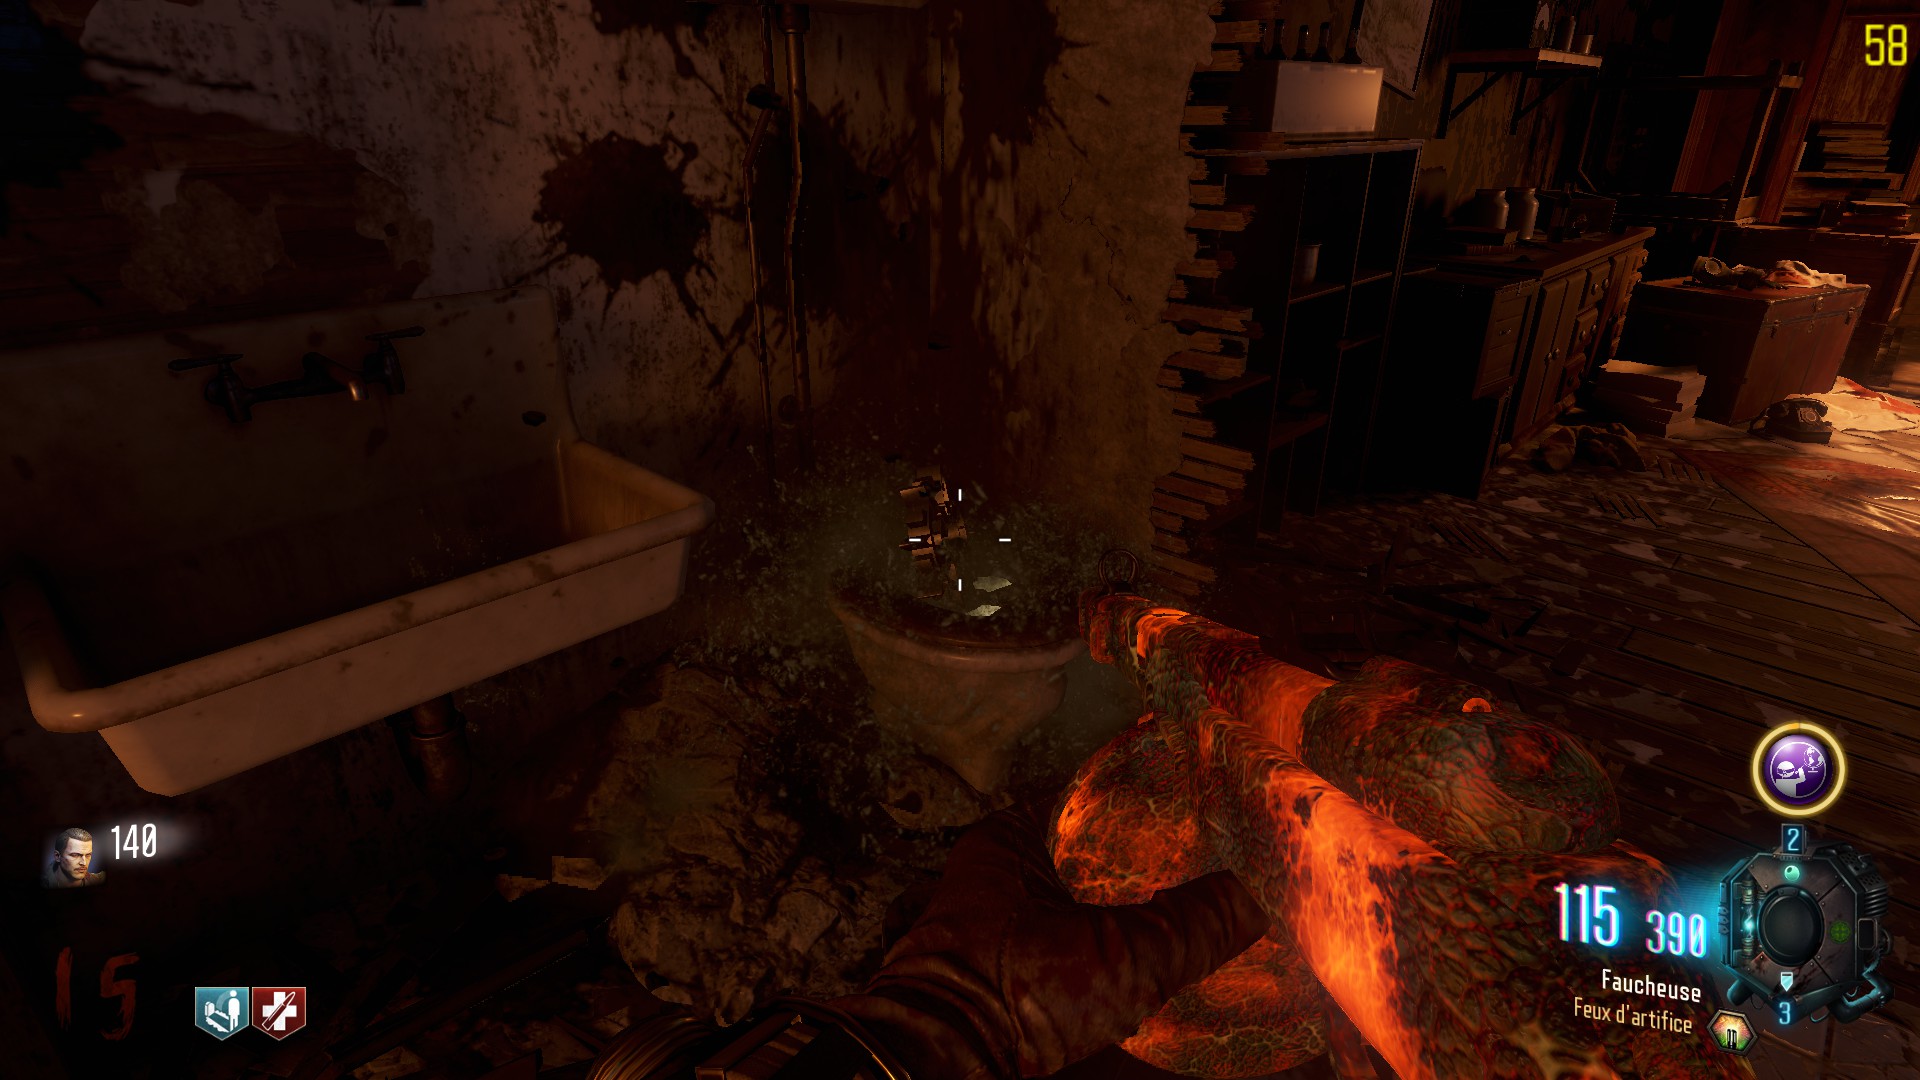
- To get the second one, you must go to the PaP and go into the sewers. You will see a red glowing light on top of the tunnel while you are ejected, shoot it. The trophy should be accessible in the toilets back to the Pack-a-Punch building.

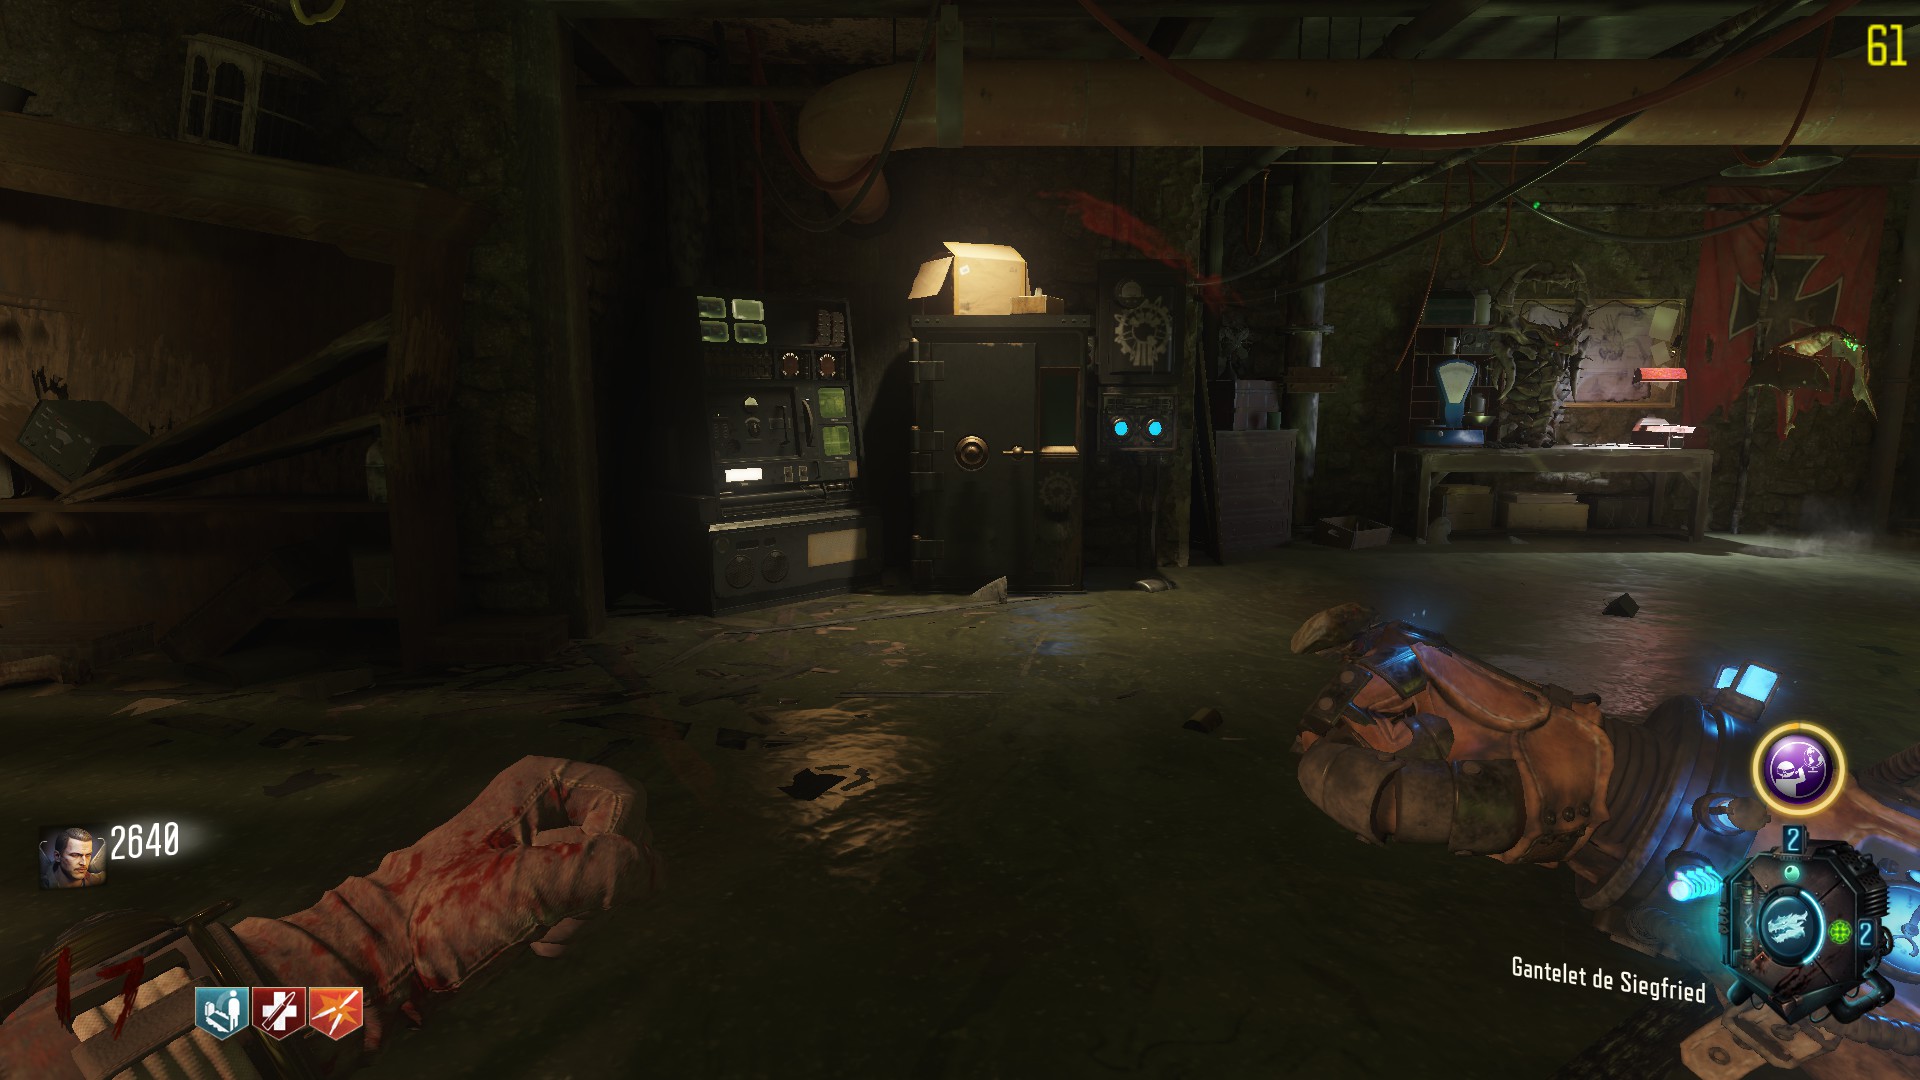
- Head to the Operation bunker (Underground between infirmary and armory) and smash the safe (near the fafnir shield's bench) with the gauntlet of siegfried. Then, just pick the trophy up.

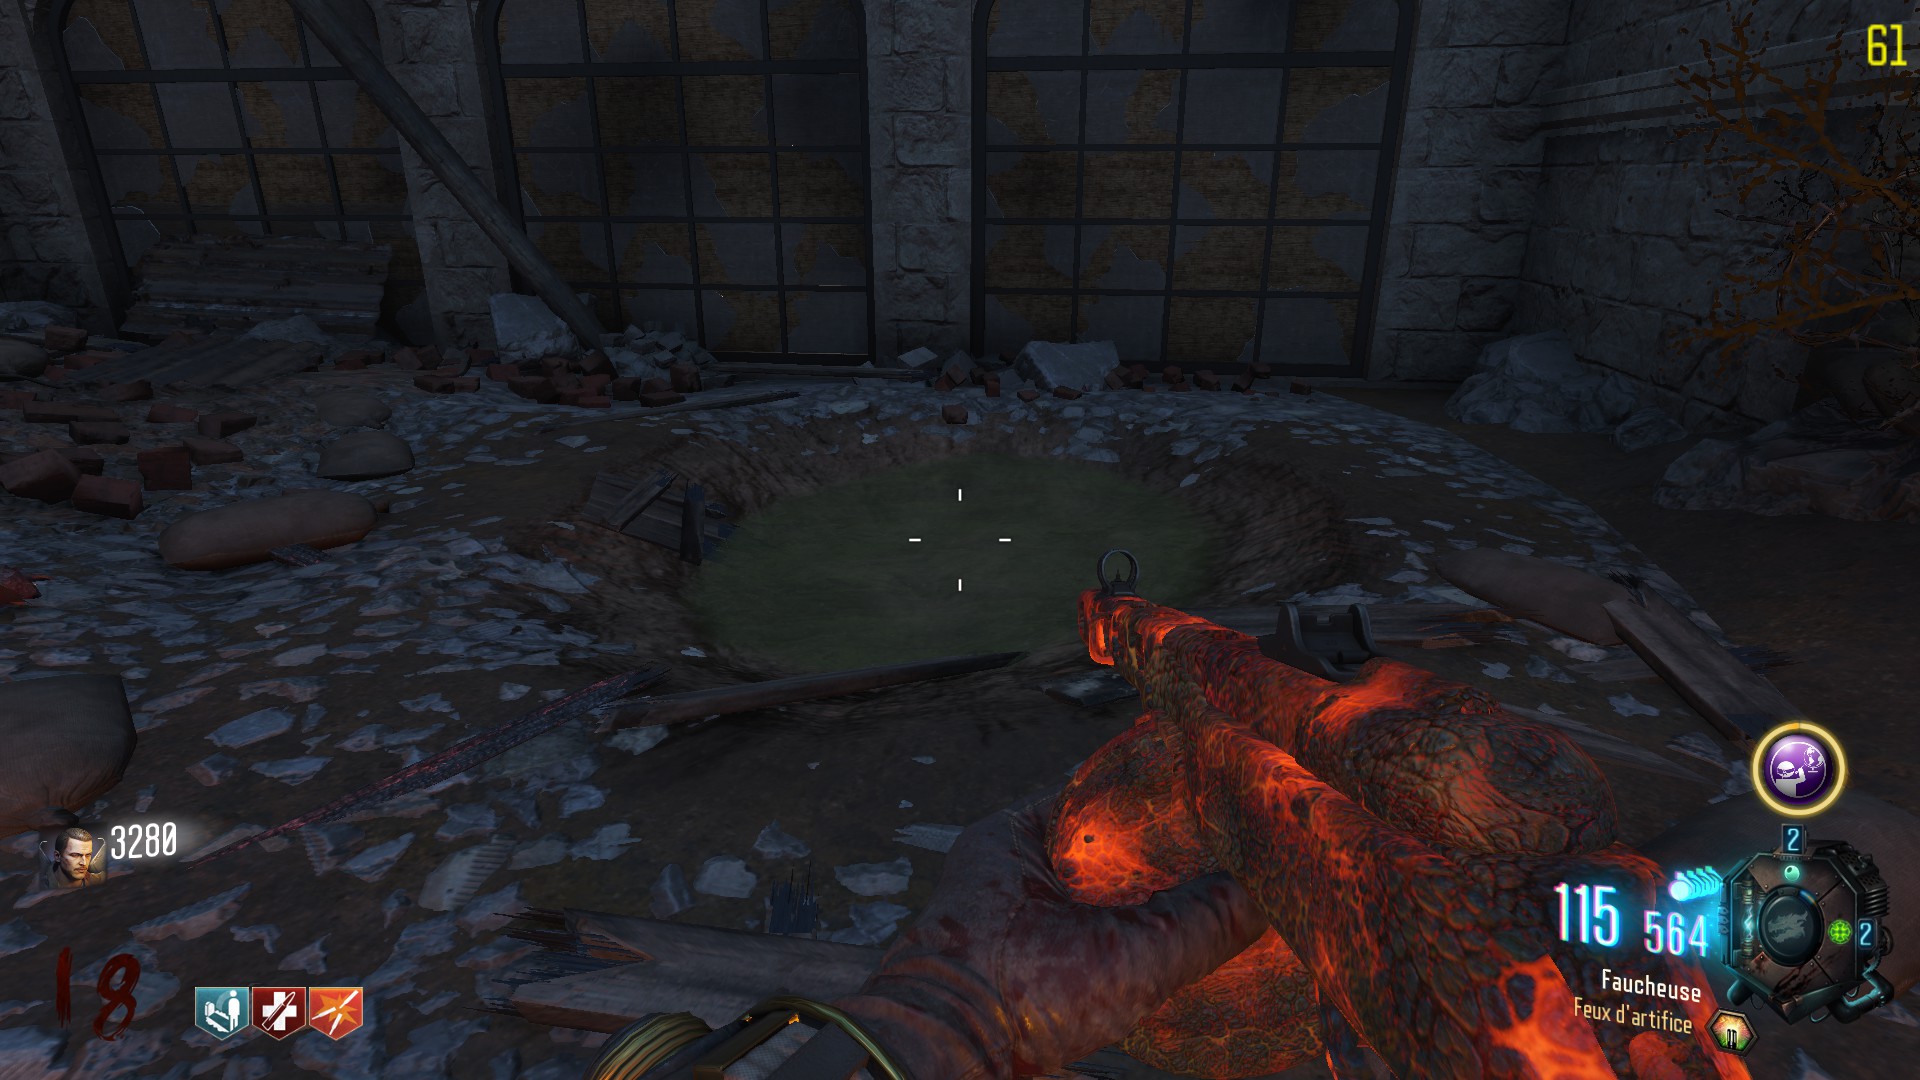
- Outside the supply depot, there is a hole with water. Use a dragon strike controller on it and just pick the trophy up.

- Activate the giant robot's laser in the supply depot. The trophy will be in a hole where the laser shot.


- Shoot with the fafnir shield in the pipe on the wall, near Double-Tap, in the Tank Factory.


Second step:
(As there is a timer, you should read part three before doing the part two)
In this step, you must activate a generator that stands in the Pack-a-Punch area, near the egg incubator.

To do so, you must destroy a Valkyrie drone close to the generator, or lure it into shooting it. Then, just interact with the generator, a flow of air should be seen.

/!\ From now on, the generator will be activated for 5 minutes, you can reactivate it by just pressing the action button on it, but only one time per round. /!\
Third step:
This step seems to be complex, but once you understood what to do, it should be fine. There are 6 valves in the map, they've got a display with an arrow where you can select 1,2 or 3. The valves also got a light that can be blue, green or white.
The valves are located:- In the Dragon command building, upstairs and then at your right.
- In the Armory, besides the 500 points bridge, a shield's part, and a "Armory" sign.
- In the Supply Depot, next to a mystery box spot, under the stairs.
- In the Infirmary, besides beds while descending the building.
- In the Tank Factory, facing some metal stairways.
- In the Departement Store, in the top floor.
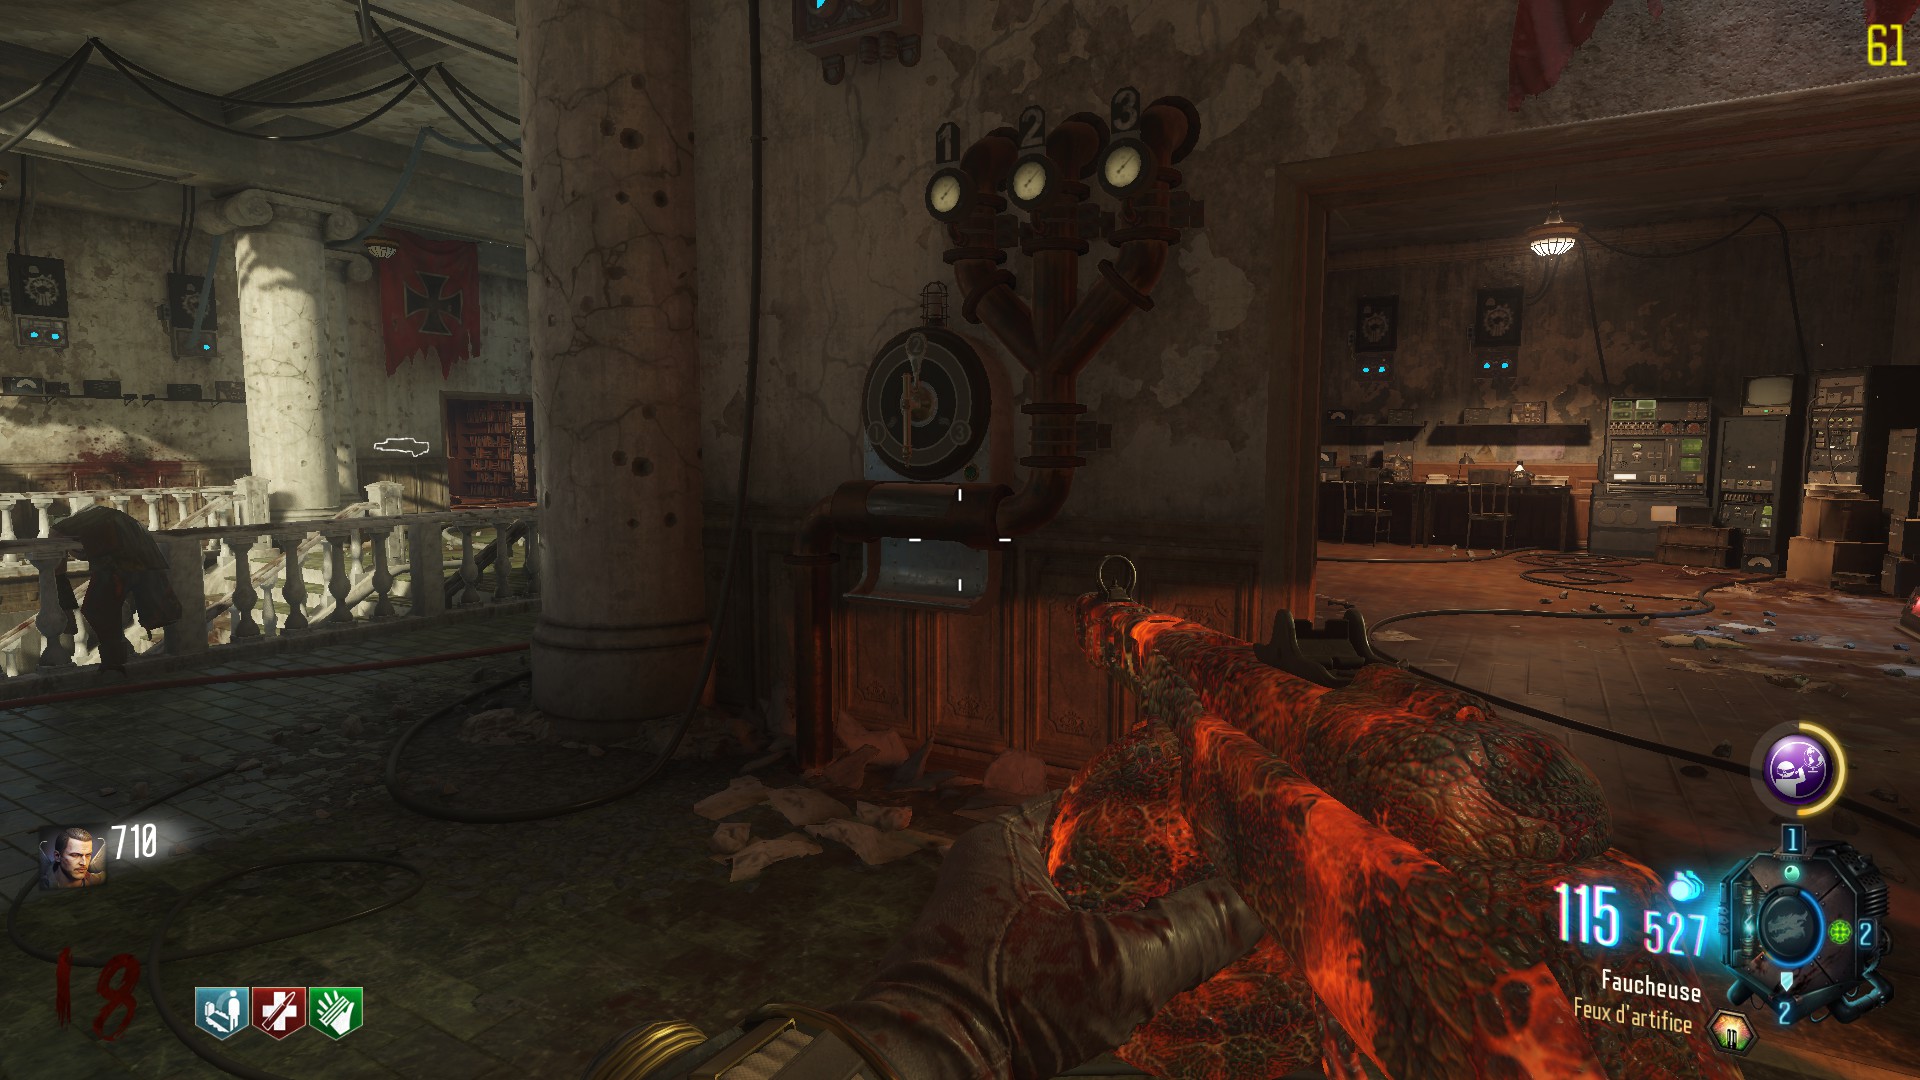


Examine the valves, inside one of them, you should see a code cylinder stuck.
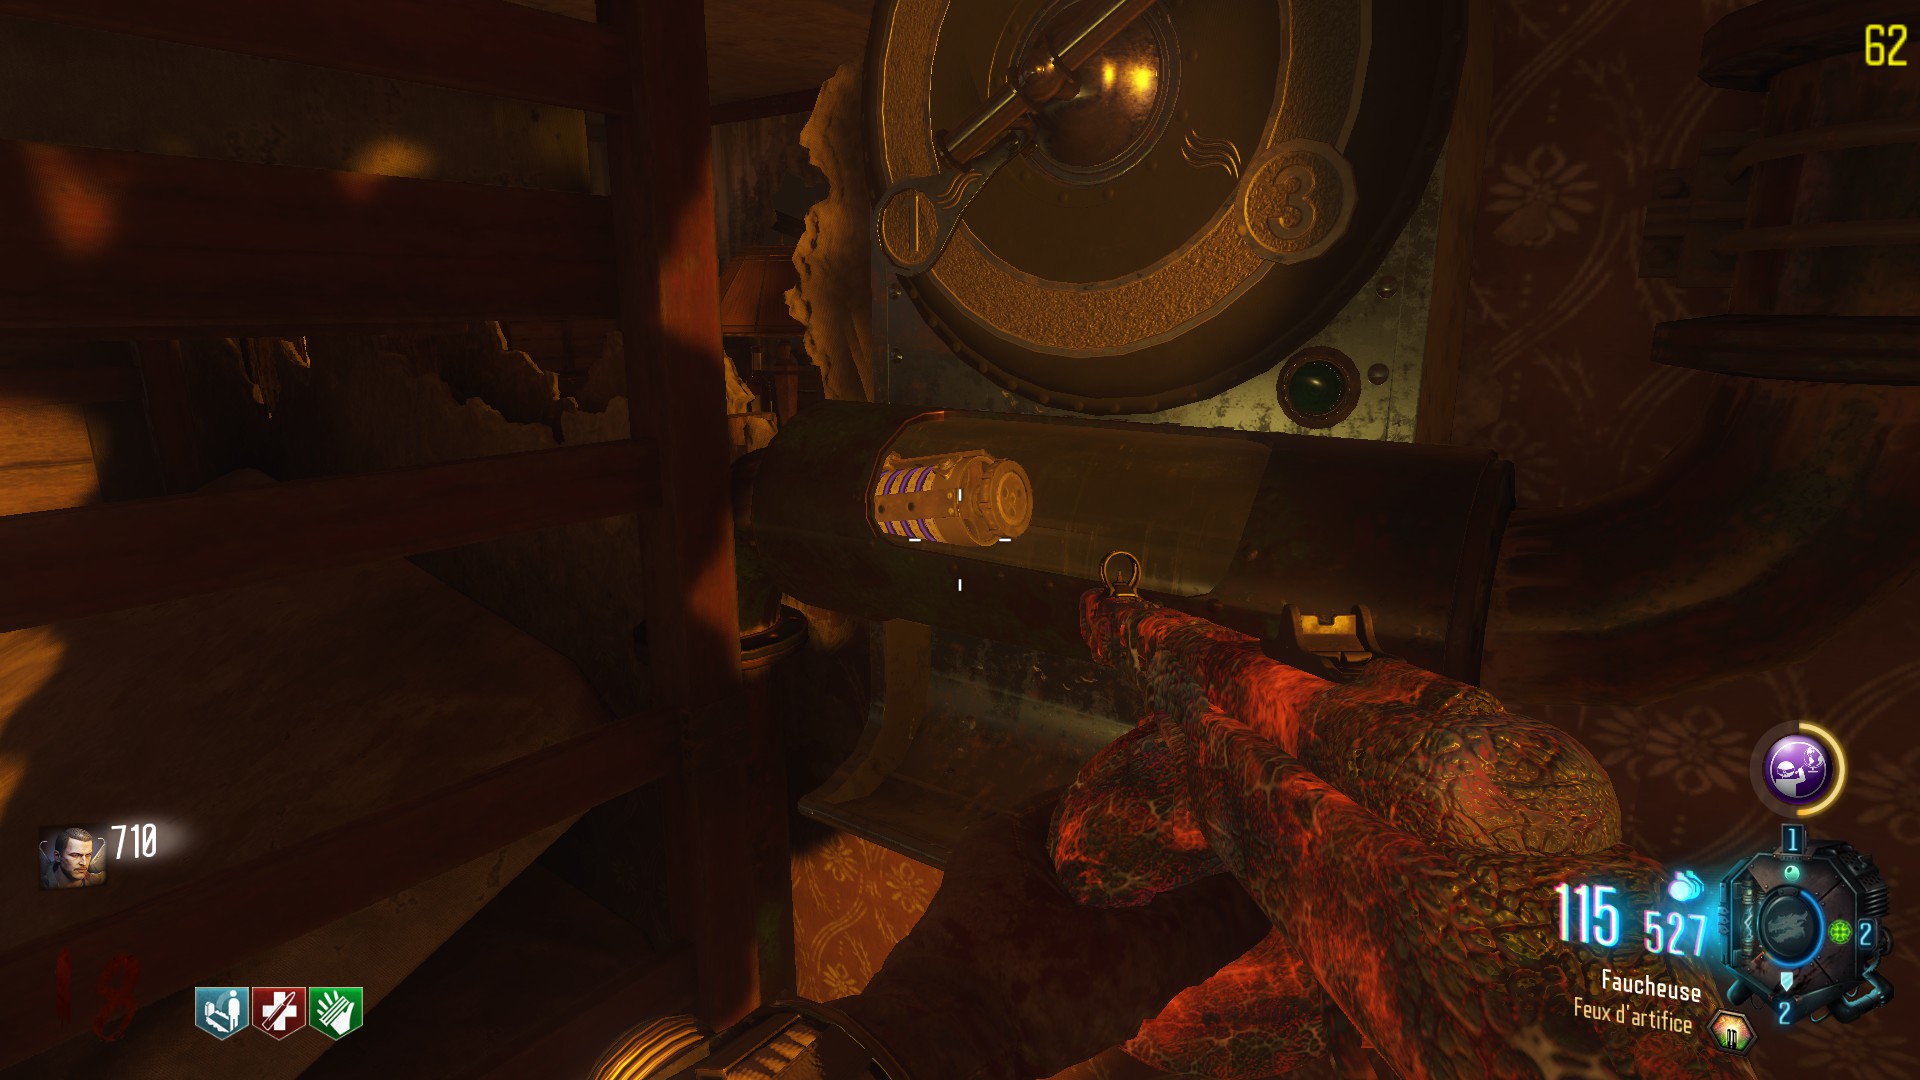
On another valve, there will be a green light, this is the end of the circuit.
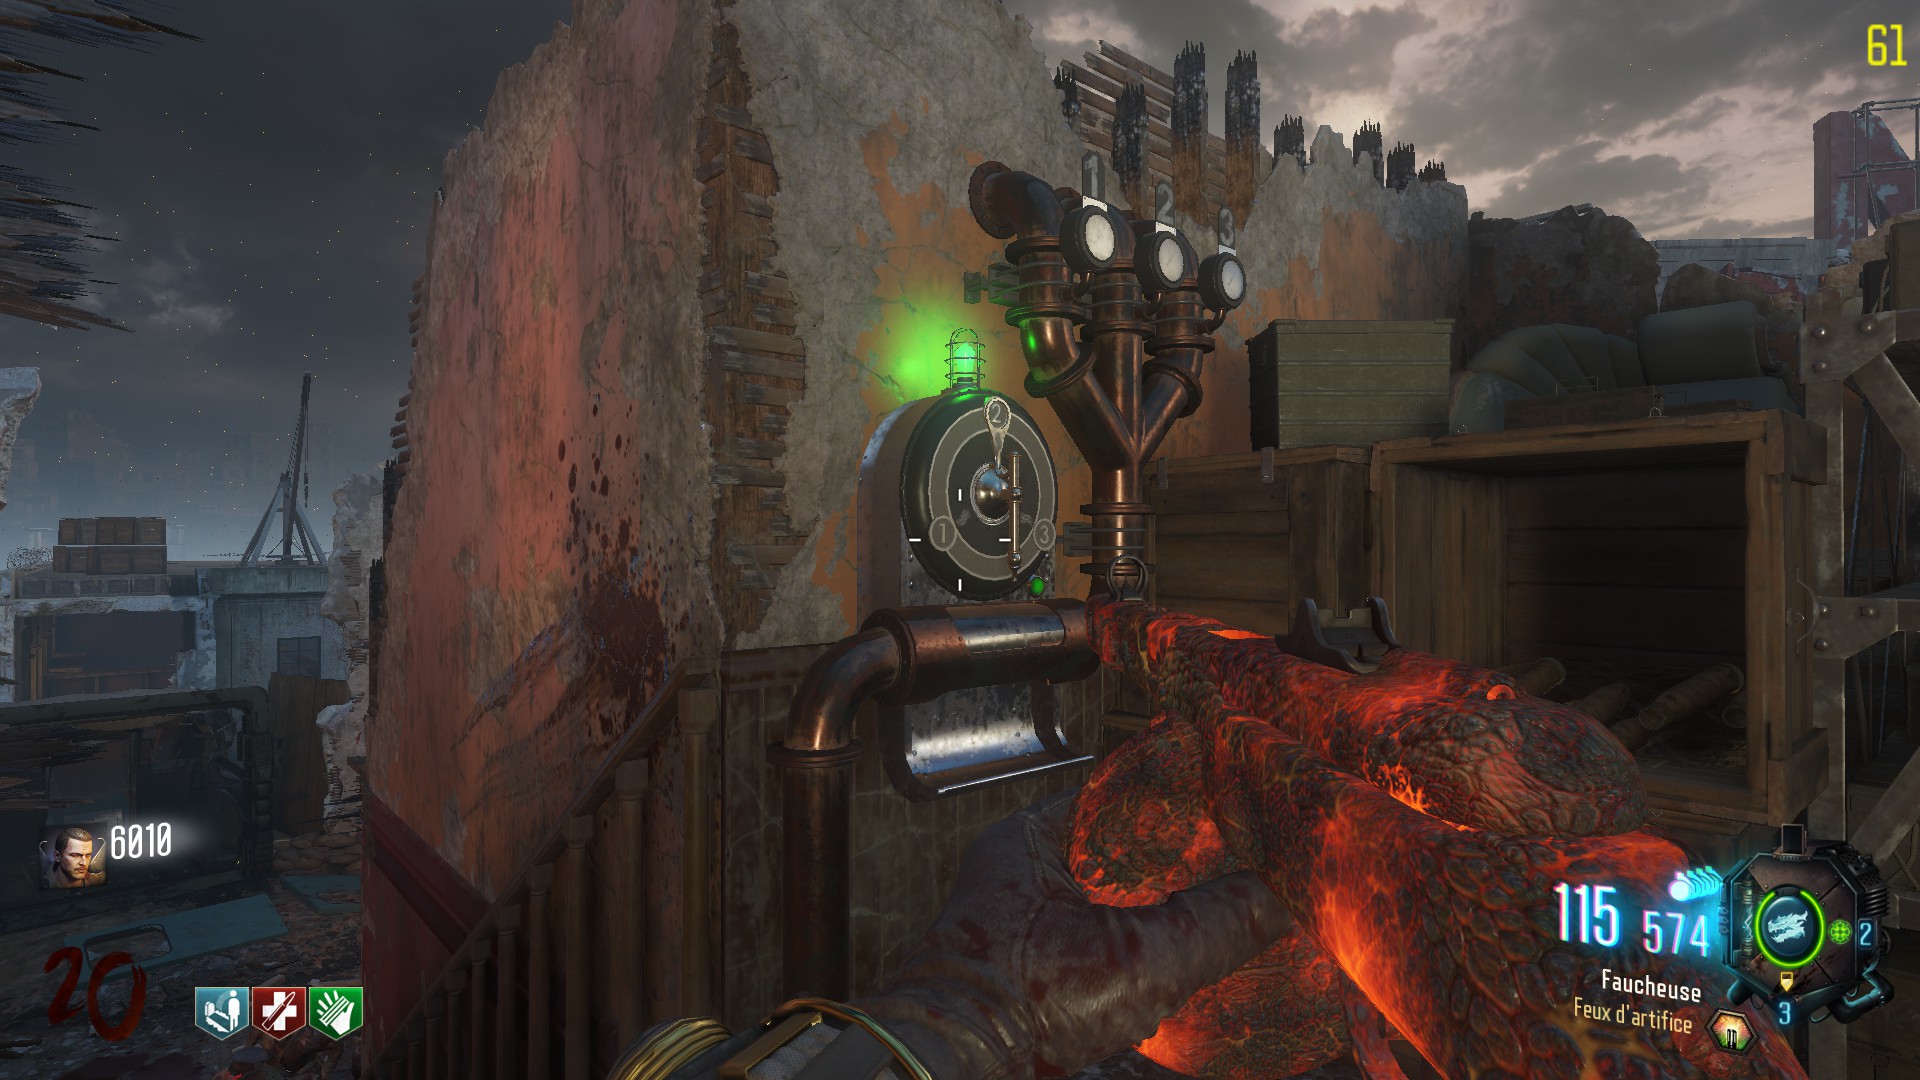
The other valves should be lighted white (meaning they are not receiving air) or blue (meaning they do receive air from another valve)
The goal is to connect all the valves, green light being your starting point and the cylinder your finish line.
To know which valves to put on which number there are two ways. The real way is to understand what how valves affect eachother and to try out a lot.
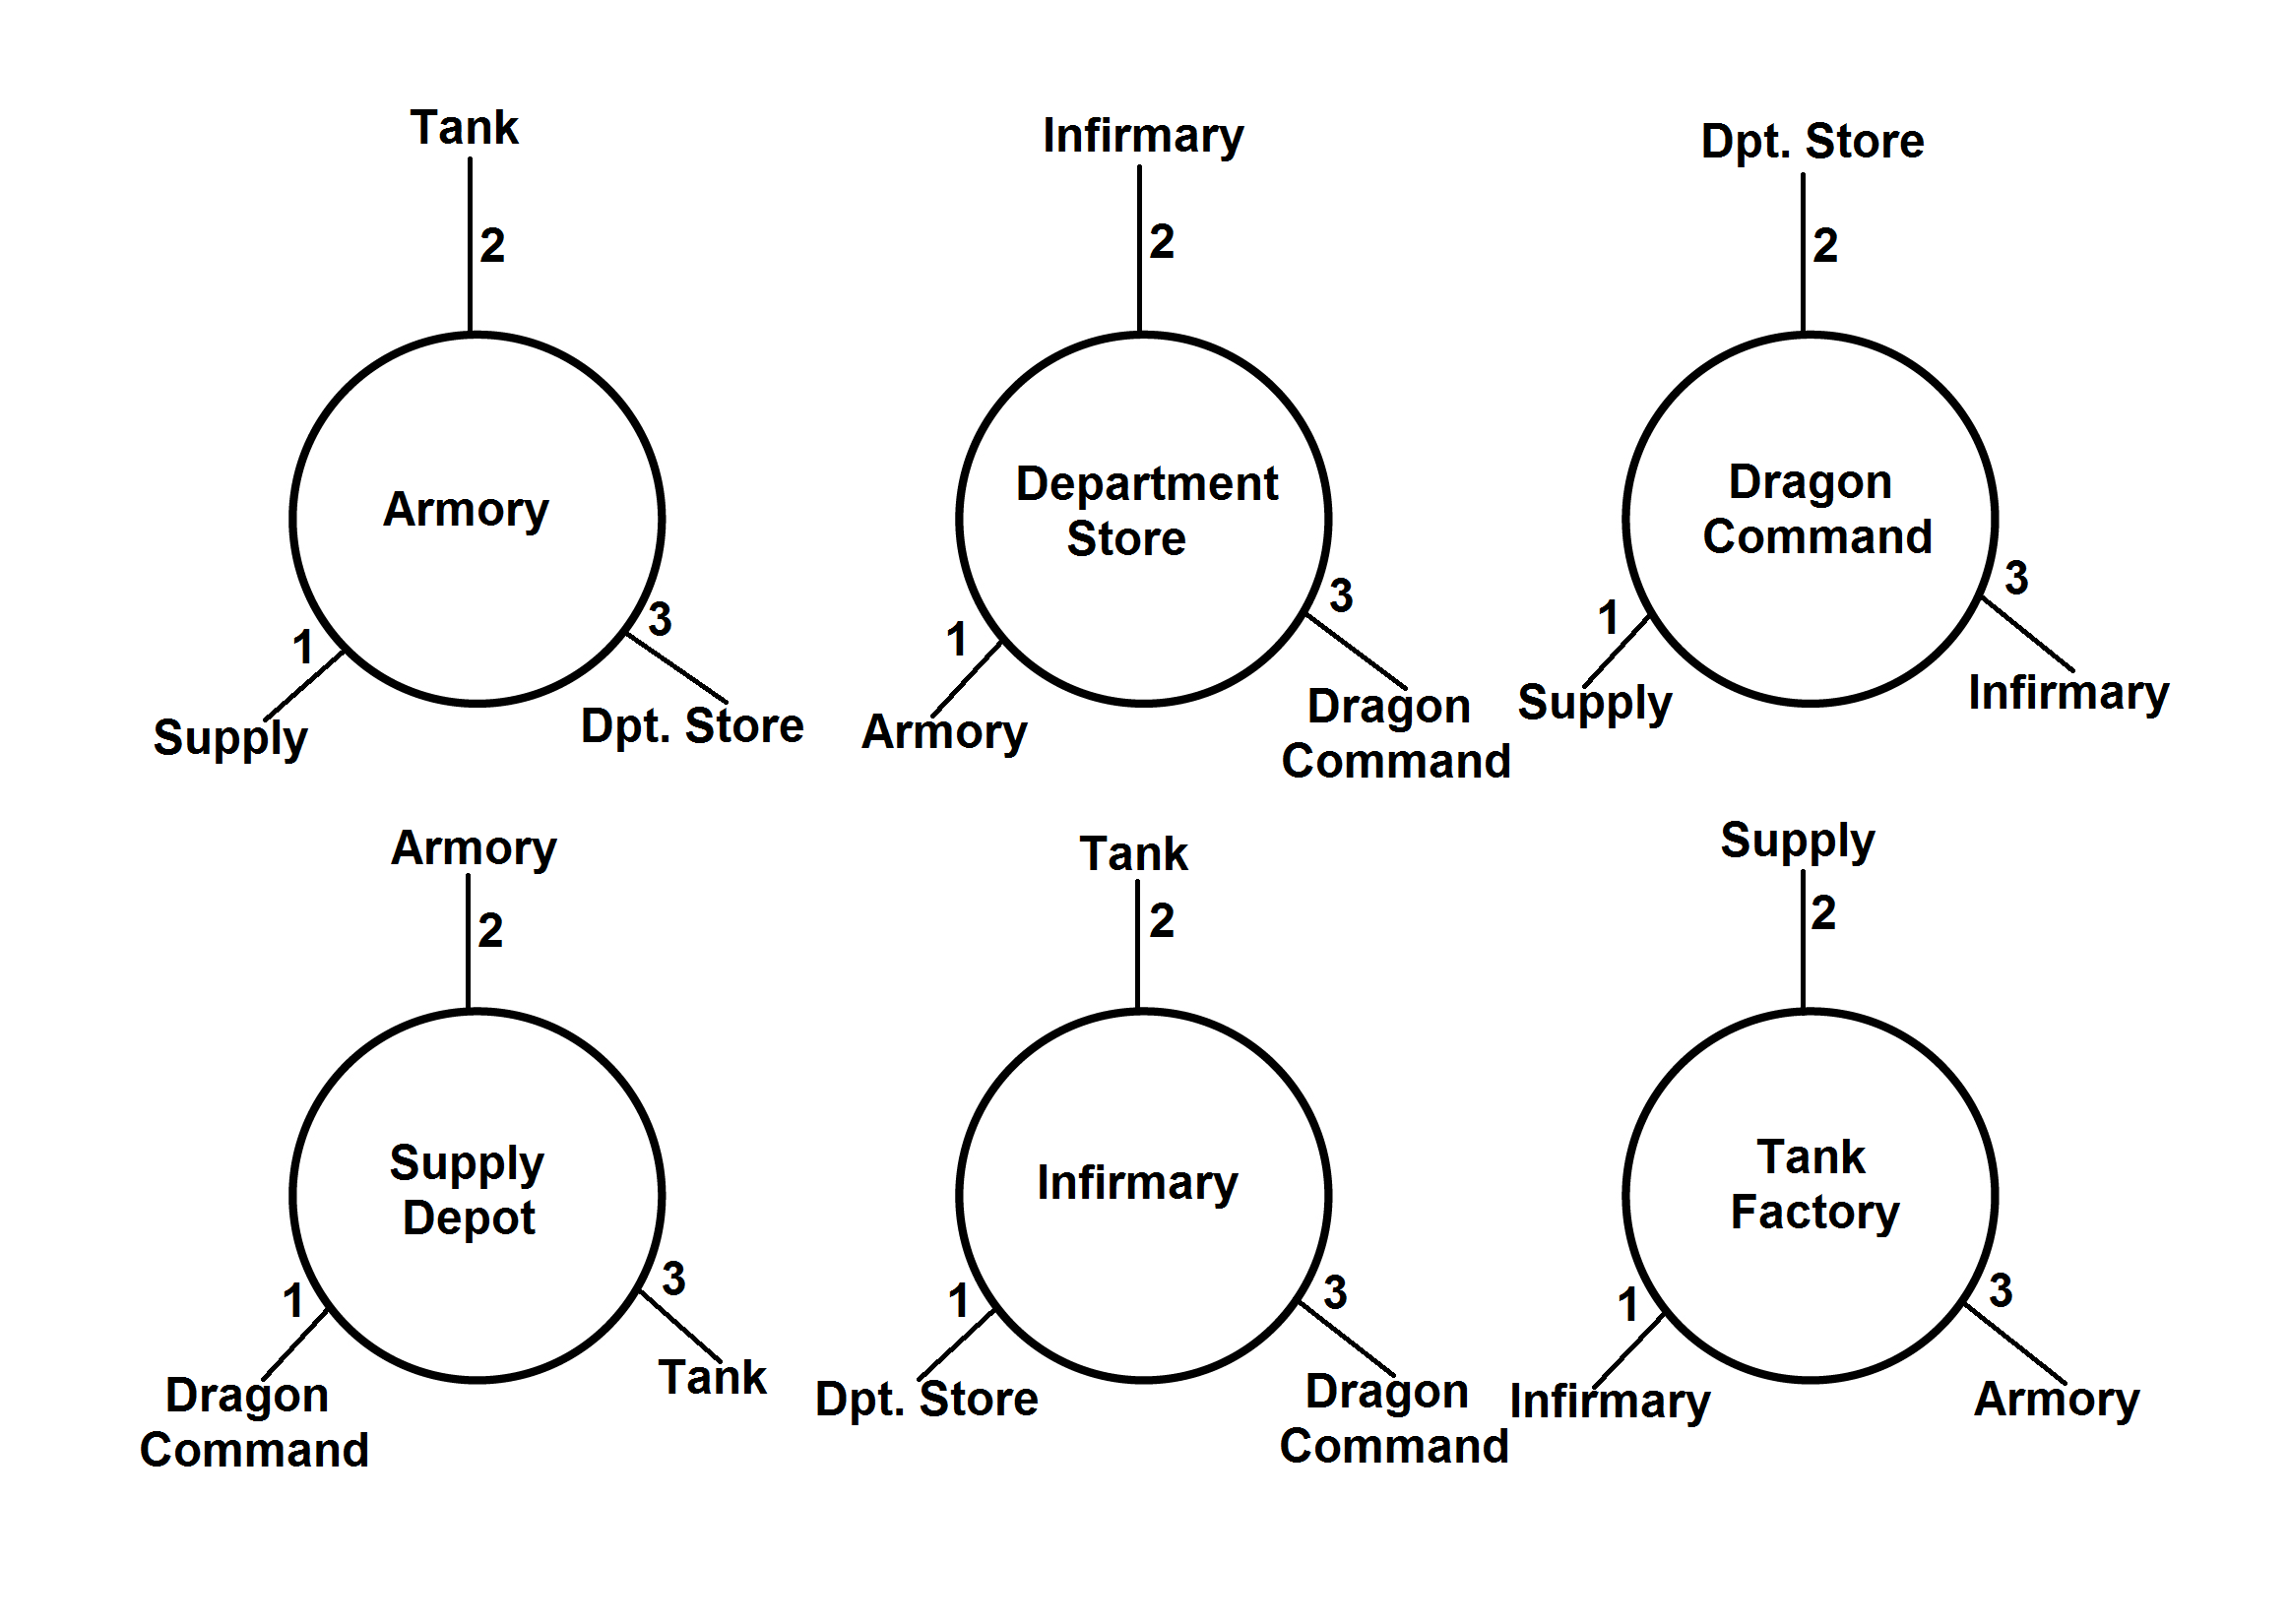
This will make your brain release steam, so the community made algorithms to quickly find out what is the correct path.
You can use this wonderful website http://www.kronorium.com/tools/airvalves/ made by the Zombie community and MrRoflWaffles (Make sure to check his channel, he's doing a great job)
Then, just point out the numbers on the valves that the website told you. Finally, just pick up the cylinder code in the last valve.
Fourth step:
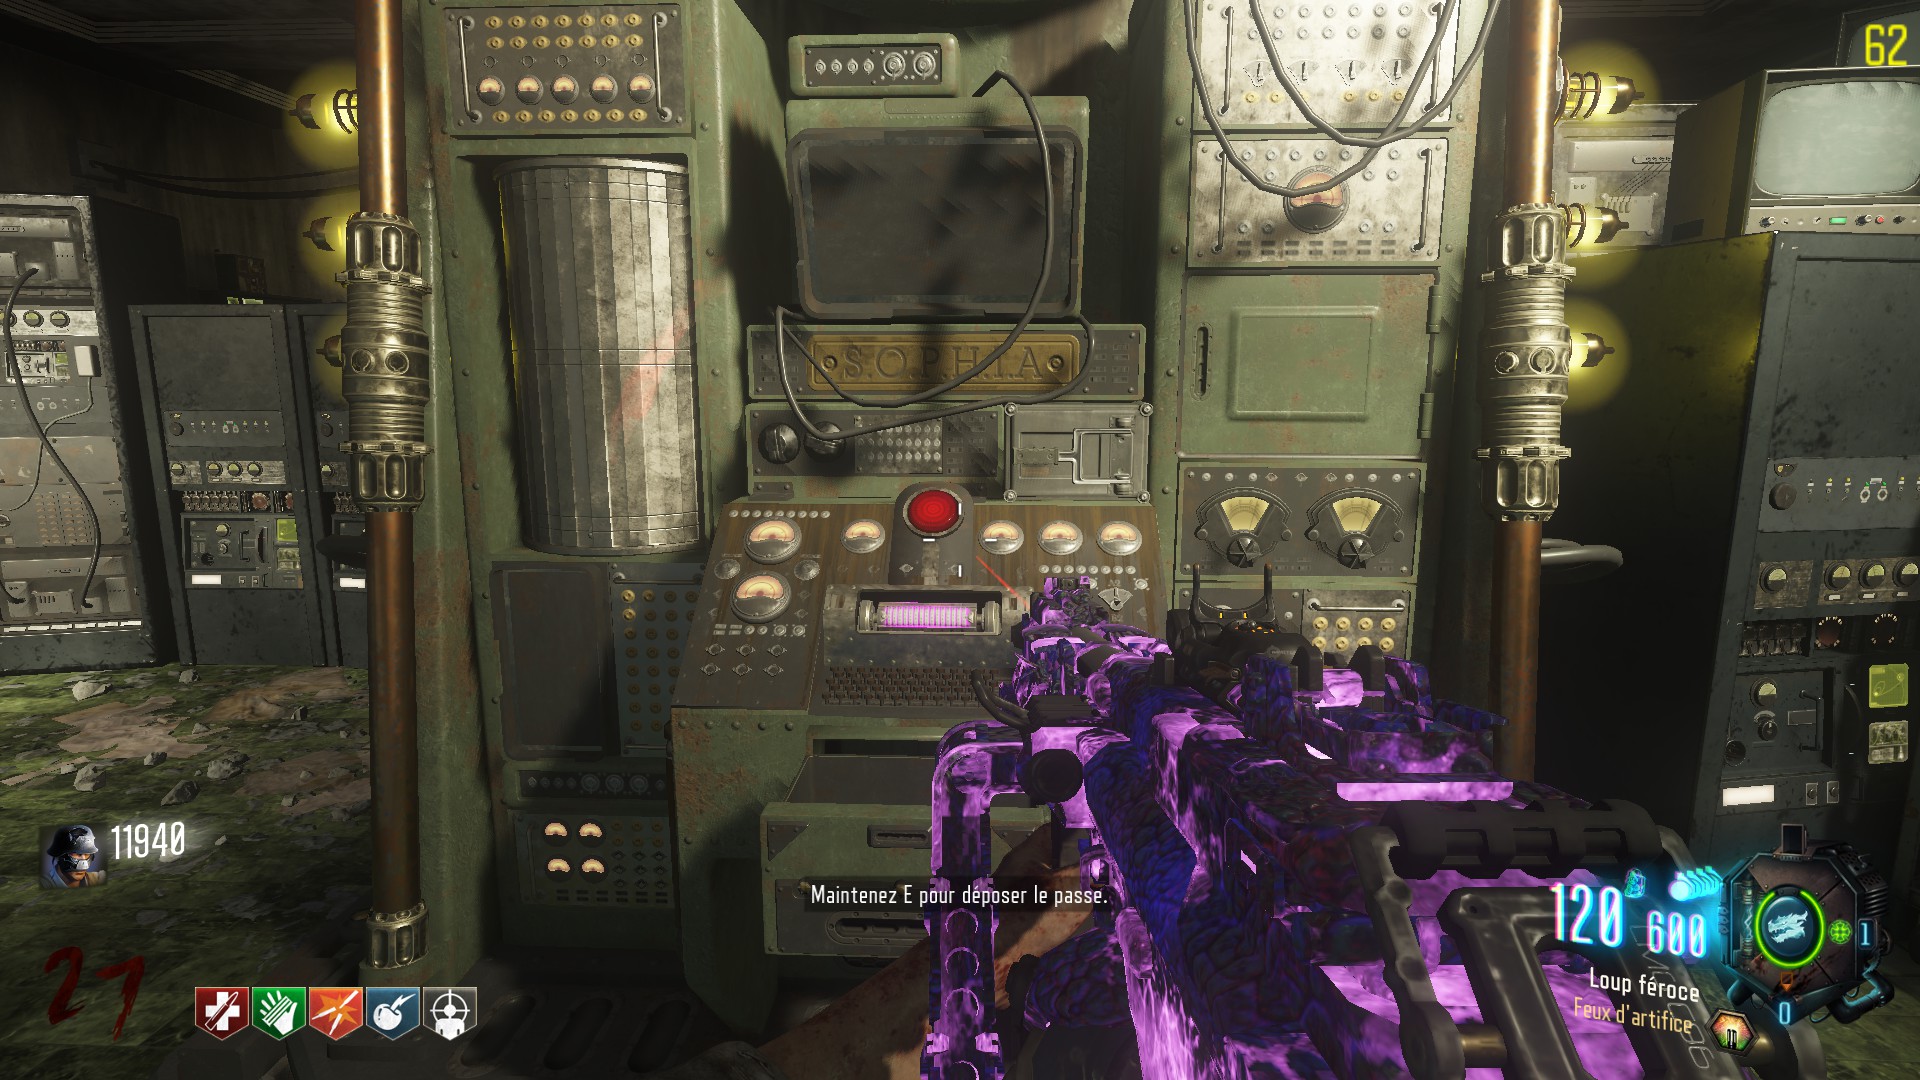
Now that you've got the cylinder code, place it on S.O.P.H.I.A. There will be 6 small cylinders on the left of the machine, with letters on them. Each time you shoot on a cylinder, it turn and shows another letter.
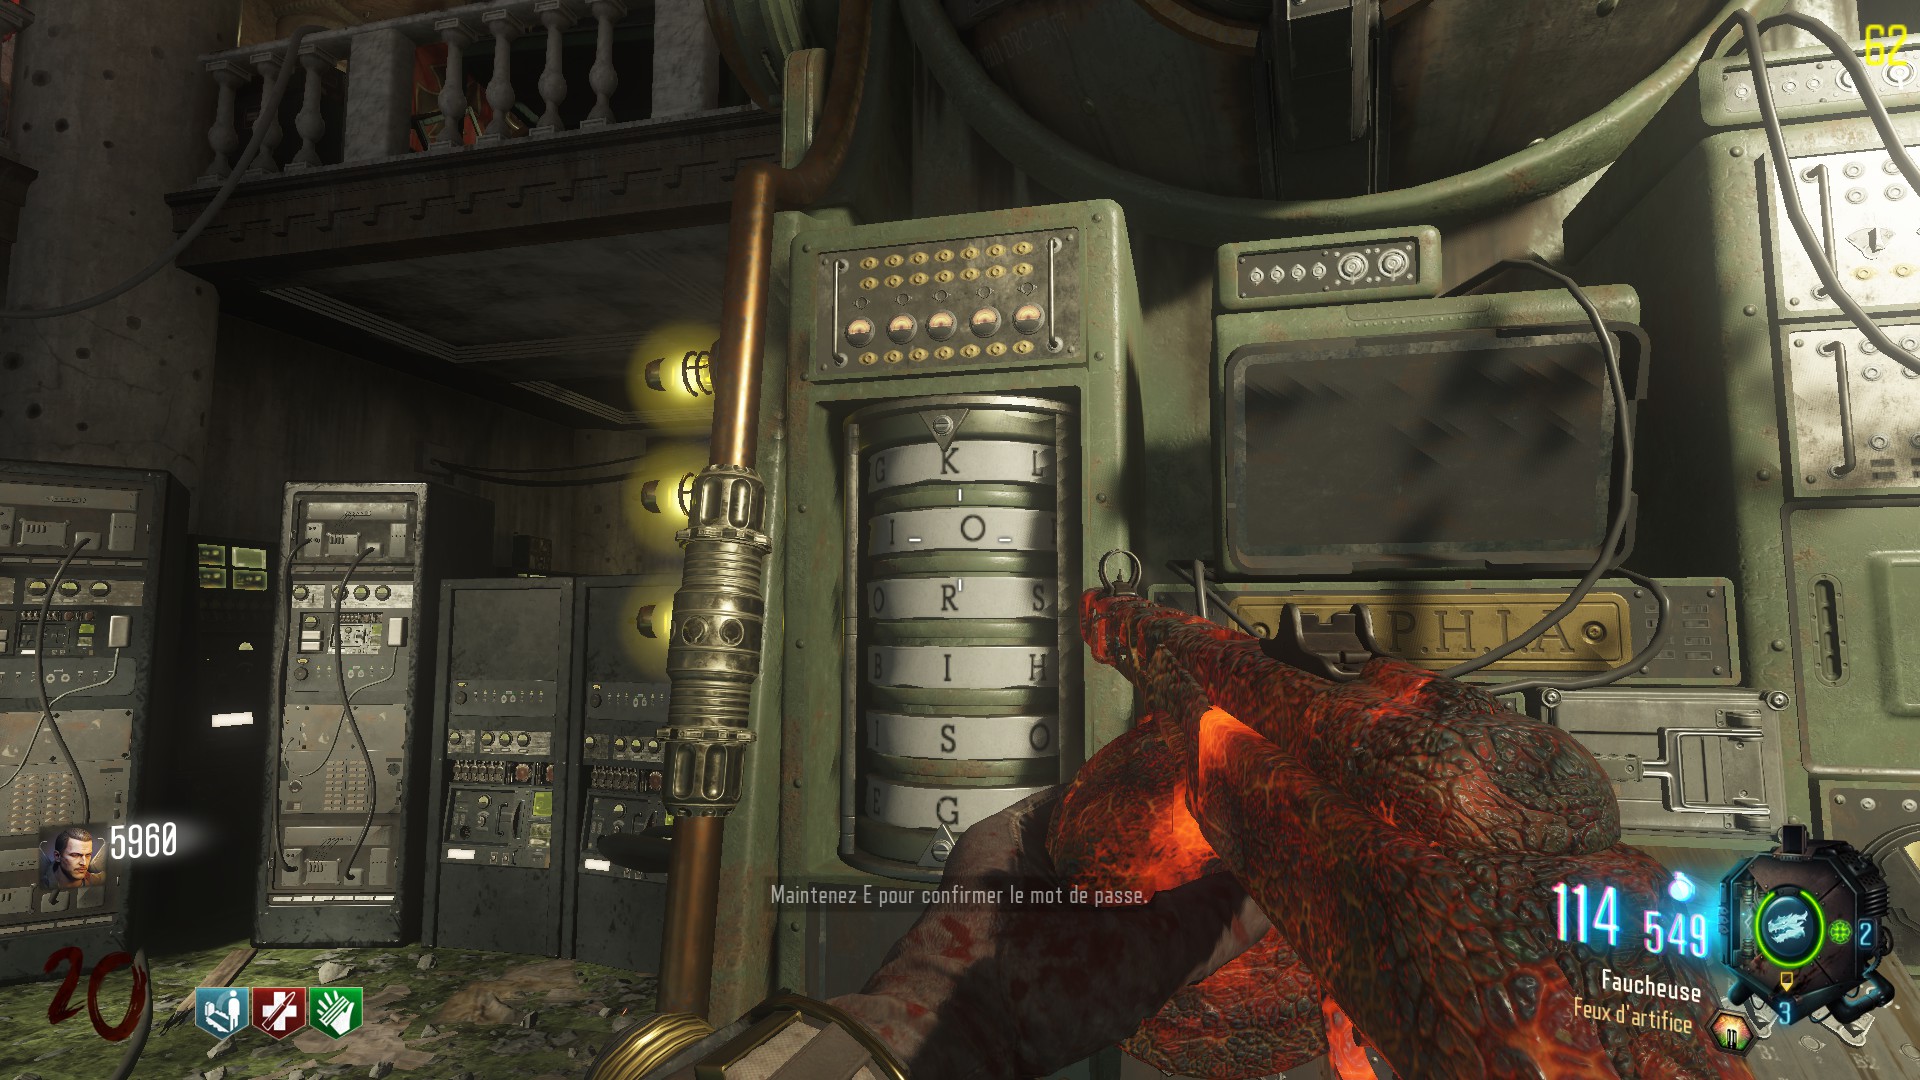
You must enter the password " K R O N O S ". Once done, interact with S.O.P.H.I.A.

Fifth step:
As a first move, you must place the 6 trophies from step 1, on the desk, under the green screen, in front of S.O.P.H.I.A.
Now, by using the command console (where you placed the trophies), a random challenge will begin, you'll have a timer and zombies will re-spawn endlessly, so be sure to read the challenges first.
For example, one ( or 2 ) players could be assigned to stay in a corner of the map without killing any incoming zombies. The two other players doing the step will be kill their incoming zombies so eventually, there will be a lower pressure on them.
Undead Man Walking, Crawl Space or Plain Sight gobblegums should be usefull.
Main easter egg - Quest - Second part
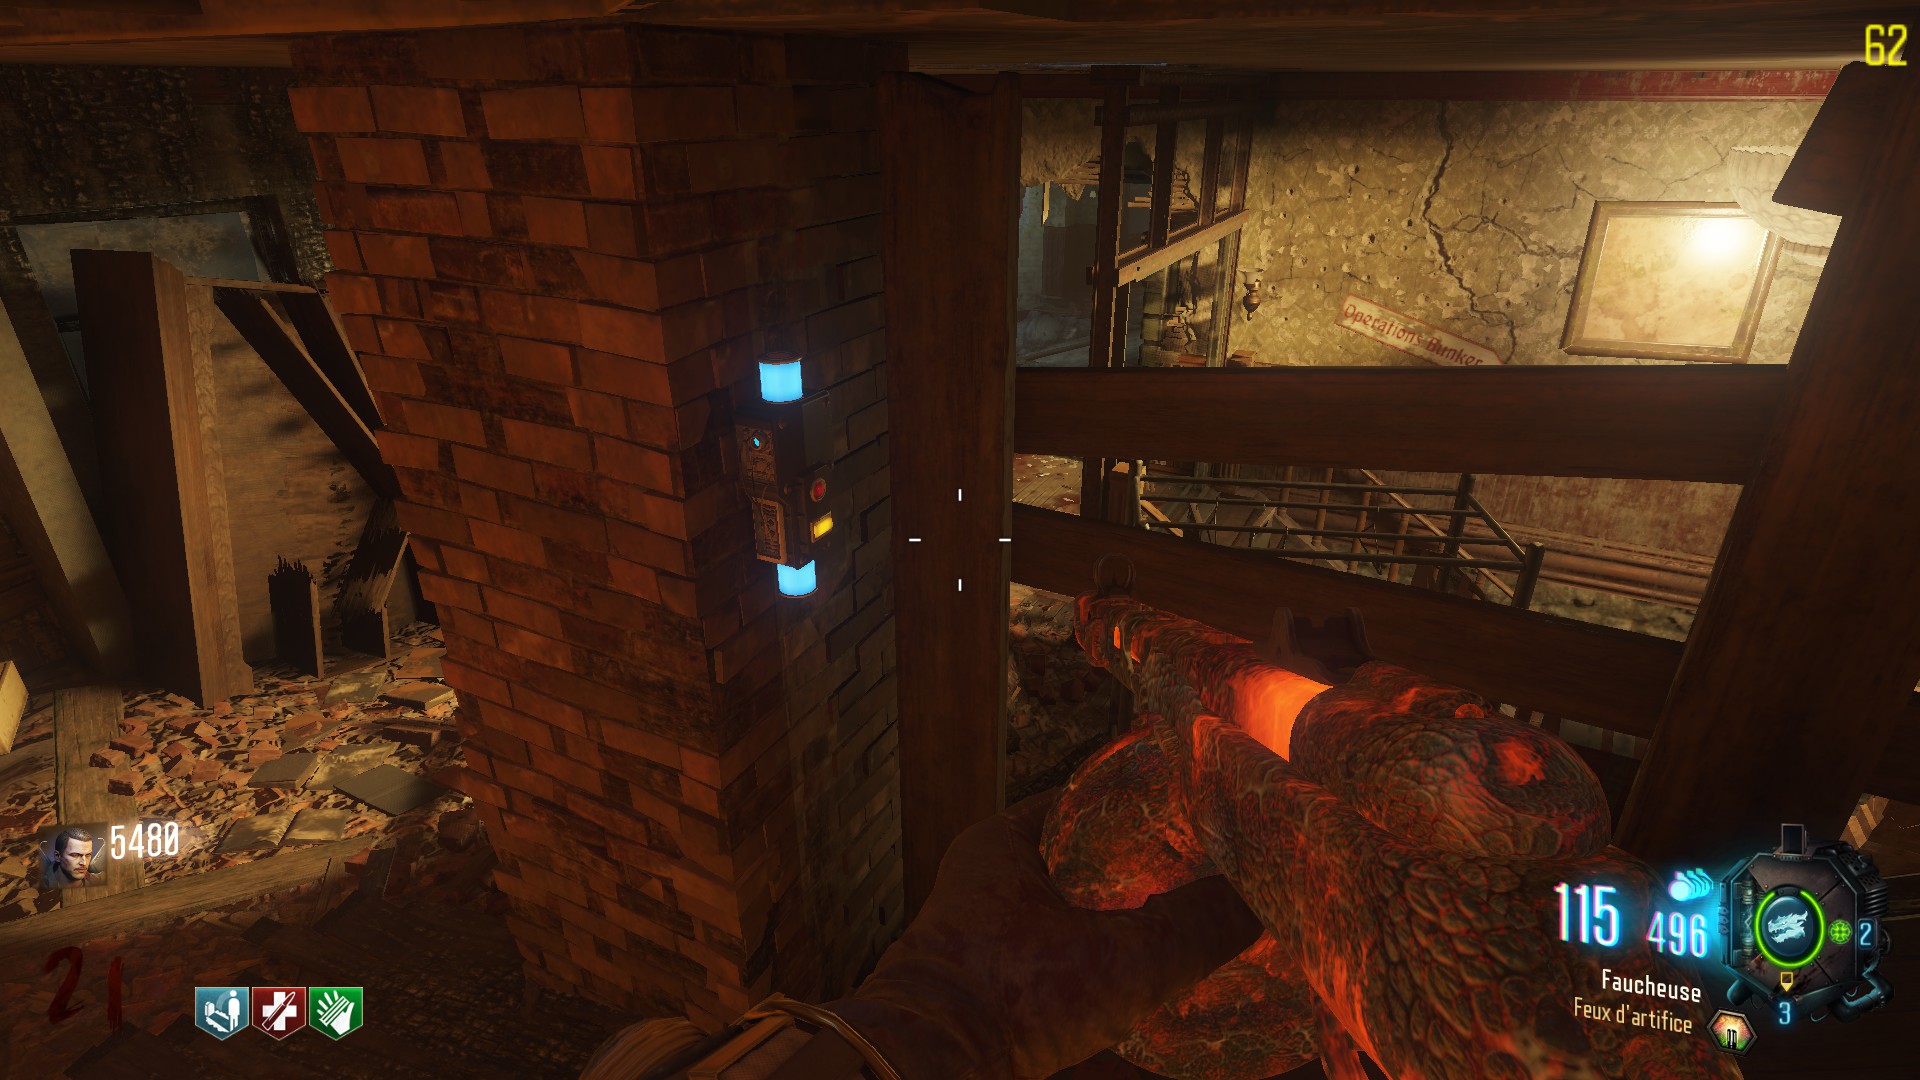
In this challenge you have to defuse 6 bombs by simply interacting with them within 2 minutes. (3 in solo)
The bombs are located:- In the Department store (Juggernog's building), under the stairs.
- Between the Infirmary and the Operation bunker, on a pillar.
- In the Dragon Control room, on the upper floor.
- In the Supply Depot, next to a map of the city.
- In the Tank Factory, near a Wunderfizz spot and a Gobblegum machine.
- In the Armory, on the wall, next to the Wunderfizz spot downstairs.


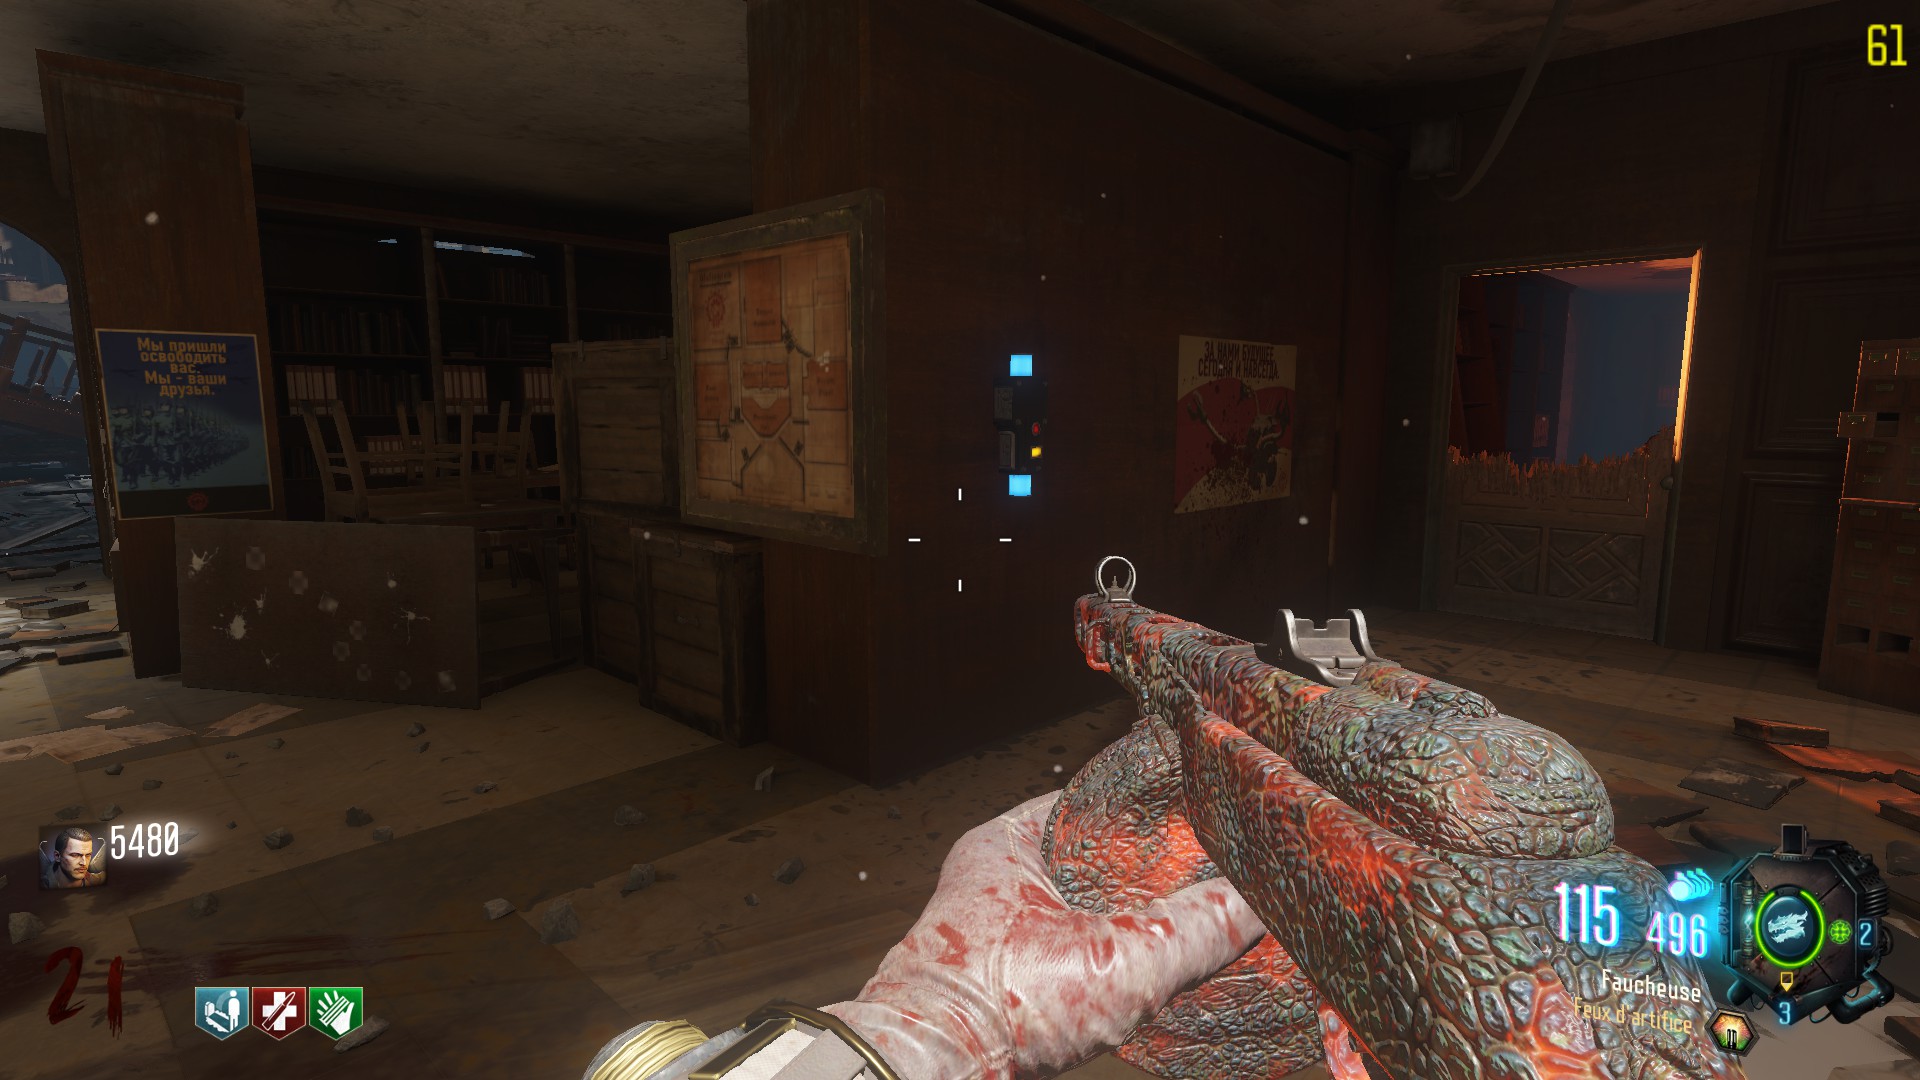
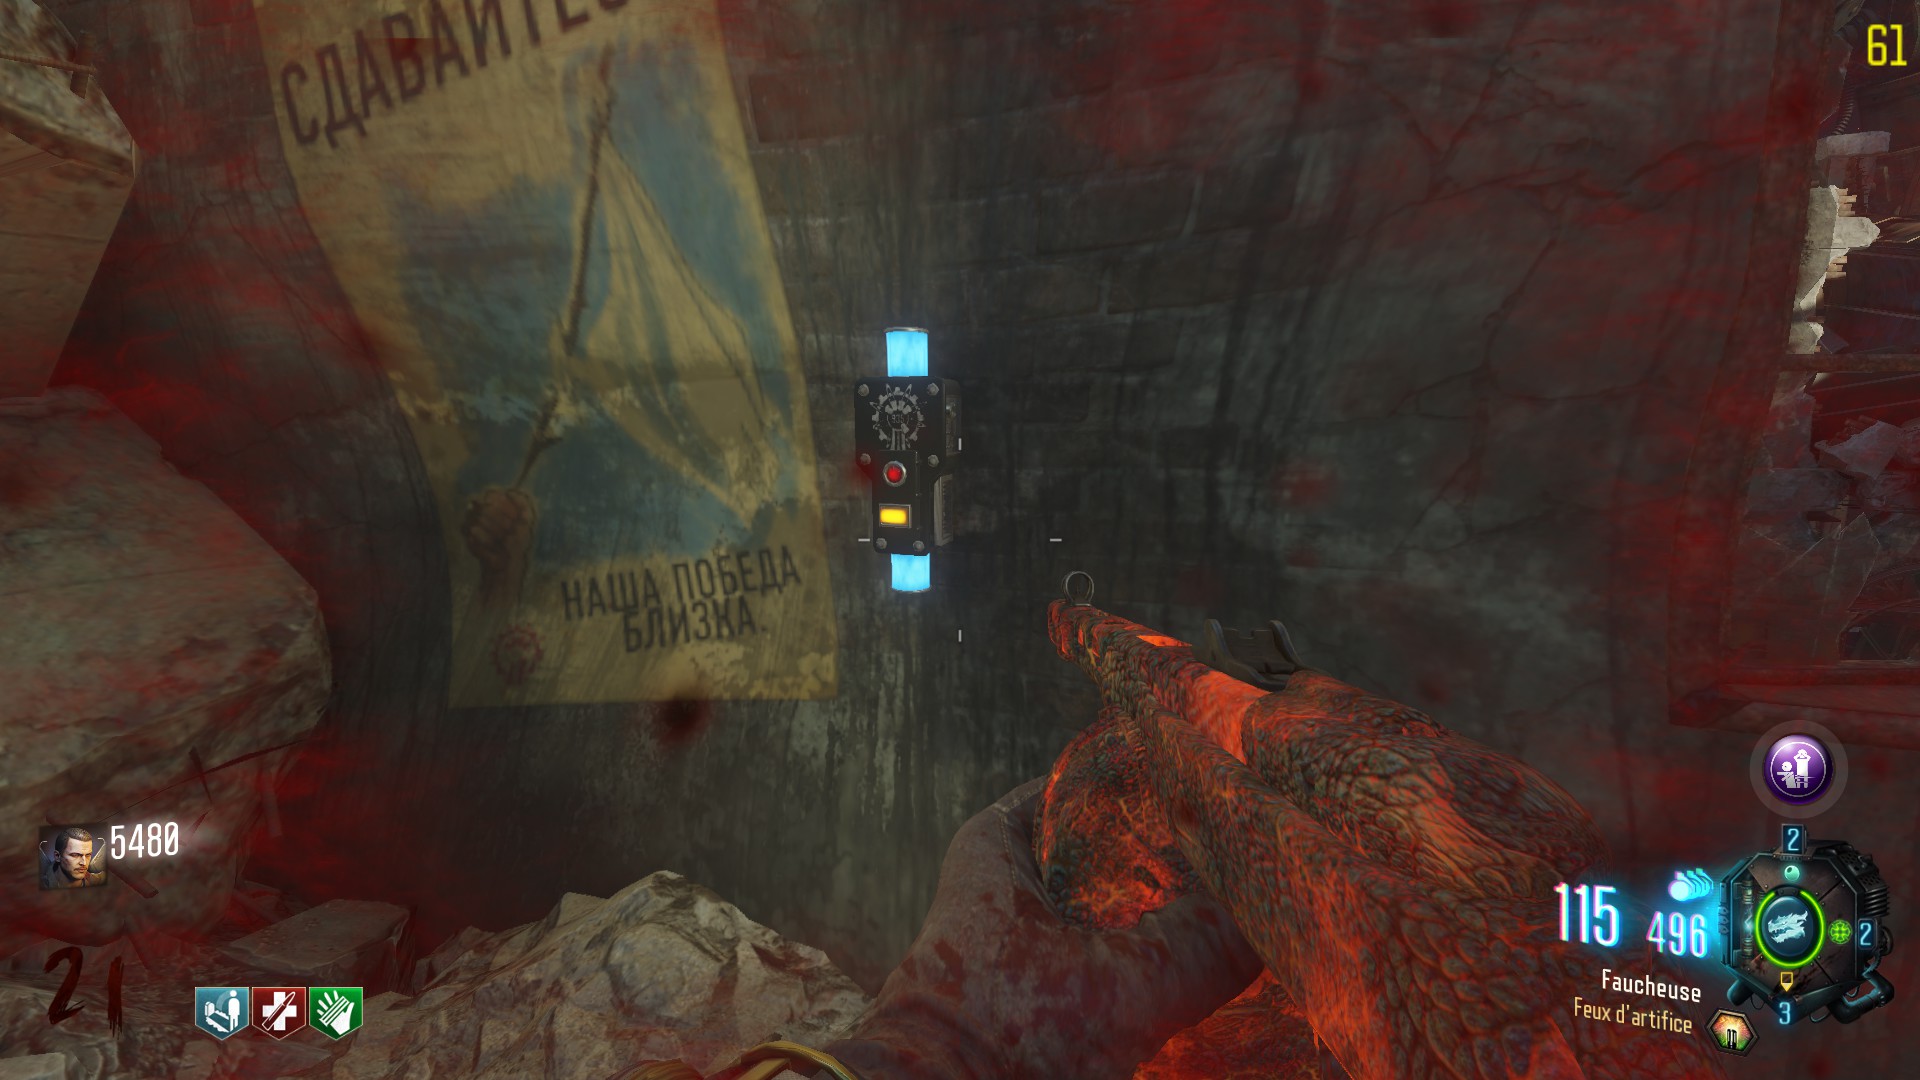

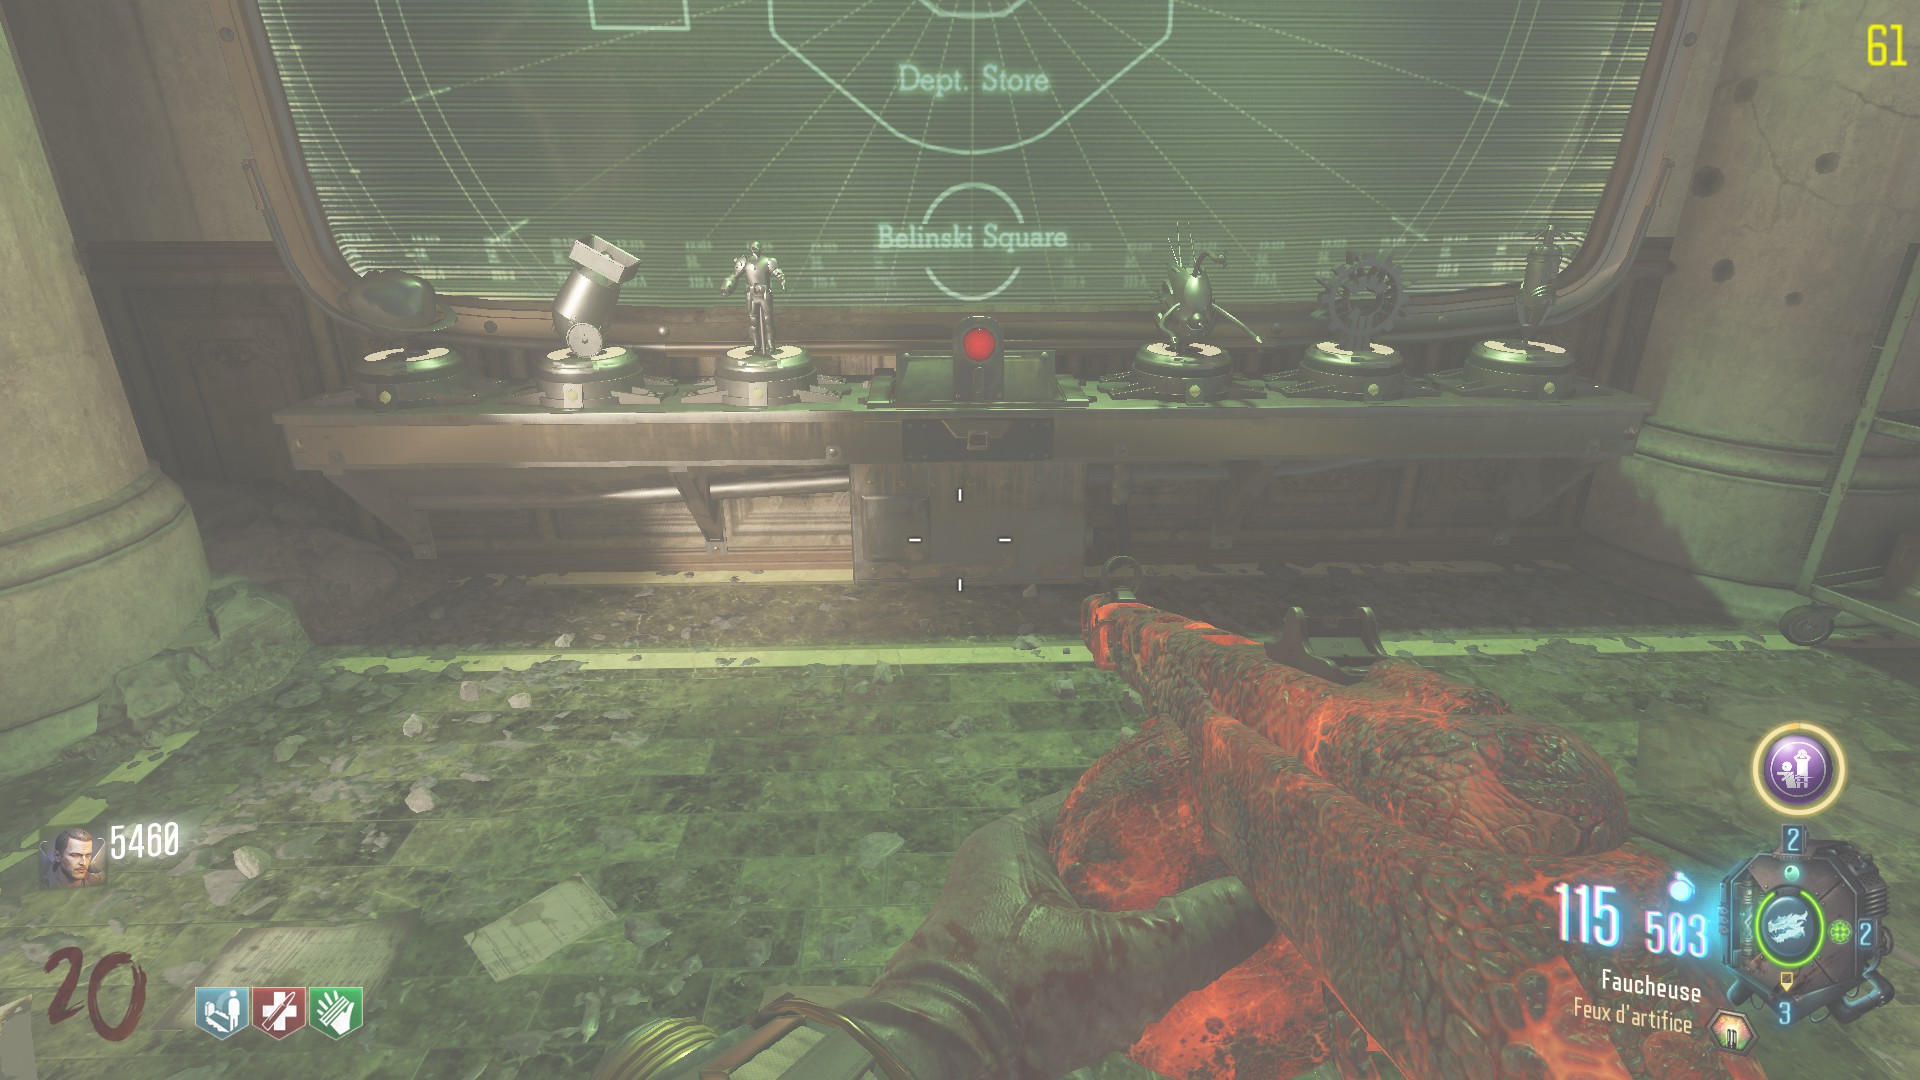
To know, in what order you have to defuse the bombs, look at the control screen above the trophies The areas will flash very rapidly, then once more a little bit slower. You won't have another chance to get the order. Either write it down with shortened names (Dpt for Department store for instance), or separate the task between players. One could remember the three first spots then run away to the first bomb and let a friend memorize the three others.
If done correctly, a voice should say something like Auto-Destruction protocole, disabled. If you defused the wrong bomb, you'll figure it out soon enough. BOOOooooom
2.Yellow orb:A yellow orb will be wandering across the map, it is the soul of Gersh, the russian scientist from Ascension. You have to shoot the orb with a Pack-a-Punched weapon until he stops to speak a few words. He will then move again and you will have to shoot him again. Do this action until he moves all the way to the Dragon Command, then just get close to him. White flash will temporary clear the map from zombies and Gersh will be trapped.

Look at the command screen, an area will be high-lighted. Head there. A friendly Mangler, will be there, with green eyes and ignoring all players but one. This one must lure him to the Dragon Command room, in the corner on the right of the trophies. You can speed up the procedure, by getting rid of his arm, but be careful not to kill him in the process.


Just like the Mangler step, you must escort a Valkyrie drone to Dragon Command. In order to make the drone move forward, at least one player must be around it.

A groph pod will land in one of the three area where you can ride a Dragon. It will be outside of the map but you can spot it by looking at the green ray in the sky.

Protect it until it opens, and send your Siegfried Gauntlet's dragon pick the part up.

Then, just give it back to S.O.P.H.I.A.

This will always be the final challenge. Head back to the trophies control screen and pick up the card in front of it.

Go to the Pack a Punch area and place the card in the Red computer.


By doing so, the lockdown will begin and manglers will spawn. You will have to resist until the download is complete (Around 2 minutes), then you'll be able to pick the card back up.

Go back to S.O.P.H.I.A and give her the card. Following short exchange, she will give you the so desired power core.

Now head back to Belinksi square (spawn area) and send your siegfried gauntlet's baby-dragon to Nikolaï 1.0 who is stuck in his mecha in the neighborhood.


is to have at least one pack-a-punched NX Shadowclaw, as it instantly revive players hit.
From now on S.O.P.H.I.A should have flown away.

In order to begin the fight, all players must stand on top of the grid S.O.P.H.I.A was sitting on.


It will open and the characters will be propulsed from the sewers to a new part of the map where the fight will occur. To start things up there is a button in the middle of the place.


The fight is separated in two phases.
- Firstly you are sided with Nikolaï 1.0 to fight a Dragon.
Infinite zombies will spawn and the dragon shall purge the area with fire. Survive until Nikolaï 1.0 decides to shoot at the dragon with his Mech., revealing one of his weak spot. The wound on the dragon will glow orange, just shoot everything you can on it. Make sure to abuse the Ray gun mark III because it deals MASSIVE damage on the boss. Use the GKZ-45 combo only to keep the horde away from you.
The spots will be on his wing, his belly and his neck.
Even when the dragon burn the whole place in fire, the borders are free from the fire. You might want to hide in those locations, as you can shoot the dragon, even if the arena burns.
You'll eventually end up slaying the beast.


Main easter egg - Quest - Third part
- Then, after a cutscene, you will have to defeat Nikolaï 1.0 in his mech.
He will attack players with his machine guns, electric harpoon and by launching RAPS.
To injure him, you must shoot on the glowing yellow lights on the robot, the last one standing beneath the pilot seat.
/!\ Be hardly careful about his chain gun, it would DESTROY you in seconds /!\[/color]
Advise: [
Again: If you got the Gkz 45 Mk3, use the Ray gun Mk3, it is VERY effective on the boss. The first wound of the dragon required 2-3 clips of my PaP-ed PPSH, while only 3-4 shots of the Mk3 were enough. lolOnce the fight is over, enjoy the cutscene, achievement and Dr.Monty speech ! Congratulations !
Mechanized Mourning, done.


The infamous bug that would make EVERY easter egg attempt to crash during the ending cutscene, thus preventing the completion of the quest / achievement, on PC and Xbox,has been patched about a year after, in 2019.
https://www.reddit.com/r/CODZombies/comments/8i8imm/psa_gorod_krovi_easter_egg_seems_to_be_broken_on/
https://www.youtube.com/watch?v=mXOuSAL7sqw
TL;DR Cheat sheet for the main quest
If you already know the steps, this can help you remember the order of the things you have to do.

Equipment - Fafnir shield
As almost every others BO III zombie maps, you can craft in Gorod Krovi a zombie shield. This one is a bit particular because instead of using a propulsion charge you can shoot green fire with it.
Moreover, holding the shield will negate all fire damages you would receive from the dragons.
- On a chair besides Juggernog

- On the door of a truck, down the stairs after Juggernog.

- On beds in the operation bunker, right at the left of the entrance.

- On the ground at your right when you are climbing after the operation bunker.

- On beds just in front of you when you climb up the building.

- On the wall, close to Stamin-up, upstairs.

- On the wall, next to a Wunderfizz spot dowstairs.

- On the wall, right to the crashed metro entrance.

- On the right wall just upstairs.

Once all the parts have been collected, simply head to the crafting table in the operation bunker's underground.

Equipment - Tiamat's maw (Upgraded shield)
It is possible to upgrade the zombie shield. It will be more resistant and it's fire will be red instead of green. (Stronger)
Firstly:
To begin with the upgrade procedure, you will have to perform 50 kills with fire blast or shield bash. A sound will notify you when it's completed.

Secondly:
The second part is to survive a fire attack from the dragons for a certain time. Just equip your shield and stay in the fire until a sound is played.
Thirdly:
You will have to hit with the fire blast of your shield, 3 purple symbols located respectively in the three places where you can call a dragon. When shot correctly, the symbol should disappear.
- There is one in the dragon control room, stay in the platform and look at the building on the left.

- Another one is in the supply depot, just look at the " roof".

- The last one is around the tank factory. The symbol is on the giant robot shoulder.

Finally:
Go back to the spawn area, near the graves there should be a dead dragon. You should be able to place the shield in the belly of the beast. After a couple of second, you'll be able to grab it back.

From now on, every shieds taken from the crafting table will be upgraded. If you cannot place your shield in the dragon, do the first two steps again.
Equipment - Special gear
There are 3 wearings available in Gorod Krovi, you are free to wear one of your choice (after unlocking them ofc), giving you different bonuses.
Dragon wings
They give you a 30% fire damage reduction and a 30% explosive damage reduction. Also, you will have the possibility to travel for free and instantly to the hatchery.. You have to use a little pair of wings located in any dragon spot.

You need to have the Gauntlet of Siegfried already done, and then simply use every station to travel to the Hatchery.
Dragon Command, Supply Depot, and Tank Factory.
Finally, just head to the Department Store's top floor, on a mannequin.

Mangler's helmet
The helmet will give a buff of 30% on the damages you deal to the manglers, and you'll take 50% less damages from the manglers.
To get it, you need to shoot down a total of 5 mangler's helmet and 5 mangler's arm cannon. Creepy sounds will play when each condition is completed.
If unlocked, the helmet is located on the Department Store's first floor, right at your left when coming from the spawn stairs. The helmet is on a mannequin.

Valkyrie's helmet
This one, will give you 30% increase damage towards the Valkyrie drones, 50% less damage taken from them as well as 50% less damage taken from electricity.
To get it, you'll need to destroy 6 drone cameras (The red glowing light) and 6 times all their 3 tentacles. Creepy sounds will play for each condition completed.
When unlocked, head to the Department Store near Juggernog. The helmet will be on a mannequin with a german military jacket.

Trials
Near the spawn you can see 4 graves with 4 trials on them. There is one grave for each player, yours is shown with a green torch on it.
The trials are separated in 3 tiers and the fourth trial will always be the same. When fullfilled they will give you different rewards.
- Tier 1 (Top trial)
-> Max. ammo bonus - Tier 2 (Left trial)
-> Pack-a-punched Mx Garand, HG-40, PPsH-41 or Dingo - Tier 3 (Right trial)
-> Extra slot for a perk and a free random perk. (So if you have 3 perks before taking the reward, you'll be able to buy a fifth afterwards.) - Egg quest (Bottom trial)
-> Gauntlet of Siegfried
Tier 1 trials:
- "Destroy the helmets on 5 russian manglers": Shoot off the head of the russian manglers ( The big armored zombies shooting at you ). Repeat it on 4 other manglers.
- "Recover 3 Pods in Green Condition": When calling a groph pod in, (with a cylinder code) you'll have to defend it from the zombies. It means it can be destroyed. The "health" of the groph pod is symbolized by the outlined light which can be green, yellow or red.
You must open three pods, while the light is green. It's pretty easy, use your best weapon, if you are in coop call your team on it and it'll be fine. - "Ride the Dragon from each Platform": Almost the same steps as the Dragon wings, you have to ride the dragon from Dragon command, Supply depot and Tank Factory.
- "Take damage from Dragon fire and survive": Thing has been patched so apparently now, you must quickly go into the dragon's fire and run outside. No shield otherwise you won't burn, thus can't survive it.
- "Kill 10 Napalm Zombies with Headshots": Wait a dragon to fiire up an area and simply headshot the burning zombies.
Tier 2 trials:
- "Kill 10 electrified Zombies with Headshots": You could wait a Valkyrie drone to drop, he might electrify zombies while trying to hit you. Also, you can wait a Special round, with Valkyrie drones. They might sometime, create electrified Zombi-skeletons. Just aim and shoot.
- "30 kills with the Dragon Shield": If you are heading to the upgraded shield this trial won't be a problem, otherwise just train around and each time you think you have a lot of people, shoot with the shield. If you run out of charges, wait the next round or break your shield and take another one.
- "Absorb Fire for 45 seconds": You must stay in an area filled with dragon's fire with your shield equipped. As at the maximum the fire will stay 7-8 seconds, you'll have to do it multiple times and wait for the dragon to come back.
- "Kill 8 zombies simultaneously with the Elevator": Train around armory or infirmary then, head to the elevator upstairs, buy the 500 access and lure the zombies to follow you.
- "Kill 10 zombies with the Gigant Finger trap 3 seconds after sliding under:" This one is pretty tricky to do, you must train and pack a bunch of undead then lure them to the trap. Activate it when the zombies are coming close, and slide under the finger. With a pinch of luck you might achieve it.
Tier 3 trials:
- "Survive four consecutive Rounds in the Hatchery": Well, everything has been said. Camp upstairs near the MG-42 or next to the gobblegum machine if you got the Gkz 45 Mk.3 it'll be easy.
- "Kill 100 zombies with the Dragon Strike": Use your dragon strike each time you can and kill as much zombies as you can. 100 will eventually be reached.
- "Kill 3 zombies simultaneously on all the Flingers": Train zombies and lead them to the flinger in front of the Dragon command. You can keep them on it with monkeys/dragon strike/Widow's wine.
The two other flingers are located on each side of the Pack-A-Punch. Rebuild the two barricades of one side until there is enough zombies, then activate the trap. You can afterwards do the same to the other side. (The flingers are disabled during lockdownds) - "Destroy all the arms on 6 Valkyrie Drones": Shoot off the arms of a drone, when all his arms are destroyed the drone will self-destroy. x6
- "Shoot the Camera off of 6 Valkyrie Drones": The red light at the bottom of the drone is his camera. Destroying it will make the drone self-destroy towards the last place he saw you.
Side easter egg - Dubstep monkeys (Upgraded monkey bombs)
It is possible to upgrade the monkey bombs, turning them into a dubstep monkey !

Each player need to do it independently. You have to pick up a flowerpot. There are 4 locations on the map and there will be a flowerpot for each player in the game. Each player will see only one pot and being able to pick it up.
They are located:
- On the desk, beside an Ace of Spades card and a mystery box spot, on the first floor of the Dragon command building:

- In the Supply depot, on a desk just after the crashed train wagons:

- In the Supply depot, on desks near an easter egg's bomb and a bottle activating the music Dead Ended:

- In the Departement Store, on a table besides the LCAR 9:

Now you must light up and pick up a candle with the Fafnir shield. Each player will only see one flowerpot and one candle.
- The first candle is located on a shelf, in the Departement store building:

- In the Supply depot, beneath the desk where stoods a flowerpot:

- On a metal table in the Tank Factory:

- On a bed besides the infirmary's stairs:

Once ignited, you'll be able to pick the candle up.

Now, you'll need to kill around 40 or 50 zombies, with the Monkey bombs.

Once done, a blue flash bonus will drop. Approach it and pick it up.

Then, head back to the spawn and launch a monkey bomb on your tomb. Look at the green torch, a message should pop-off telling you to press Use.


Enjoy the Wub Wub Wub !

I kept this LITTLE detail for the end, there is actually an easy roundabout way to get the monkeys upgraded :D You will need to get the gobblegum Crate Power. Once eaten, just pick up the monkeys from the mystery box.

Wub Wub Wub !
Side easter egg - Samantha sorrow (Screenshots are coming)
Common easter egg, Samantha Sorrow will require you to play a short Hide and Seek game. Rewarding you with a Max ammo bonus and the music Samantha's sorrow.
First of all, you will need to throw monkey bombs in three different areas litted with flames by a dragon.
A sound will play upon completion. Now head to Belinski square, a doll should have appeared in the corner between the spawn foutain and the graveyard, in front of a tomb. Pick it up.
At this point, you will have to shoot 5 dolls appearing one by one, hidden in various locations. They will play music to help you find them. Keep in mind that you have a timer, if the mini game is failed, Samantha will laugh and you will have to interact with the grave again to restart it.
They can be:
- On top of a wooden pole next to the graveyard
- Inside Department Store, bellow the second staircase (Visible from the first staircase)
- In the Infirmary, on a table in front of the mystery box and Stamin-up
- Bellow the Infirmary, on a table placed on a broken floor, in front of you when you are going down to the flooded cave
- In Dragon Command, on the top of the unbroken pillar on the left of the staircase
- In front of Dragon Command, on the Tank's cannon
- In front of Dragon Command, on a metallic platform, up on the left of the building's entrance
- Outside Supply Depot, behind a window, besides the Dragon-calling-device
- Inside Supply depot, above the Yellow console
- Between Armory and Supply depot, in the second, unreachable train wagon, visible from the one used as a bridge.
- Outside Armory and Supply depot, on the first lamp on the right, above a giant sign with a Valkyrie drawing and a text in russian
- Outside Tank Factory, hanging down in a sewer Pipe
- In the Tank Factory, on a beam on your right, when waiting the dragon.
- In the flooded Operations bunker, outside the window close to Mule kick
This list may not be exhaustive, if it is the case, keep in mind that dolls will play music and might disappear after a certain time. Make sure to tell me in the comments if i missed any location, i will gladly add them !
Once 5 dolls have been found, you will hear a sound. Simply head back to where you picked up the doll to interact again with it, ending the mini game.
Side easter egg - Secret song 1
The first secret music hidden in Gorod Krovi is Dead Ended.
https://www.youtube.com/watch?v=wmEU-VypsHo
You need to activate three Vodka bottles located around the map:
- The first one is in Department store, just after the first door you open from spawn.

- The second one is in the courtyard, just after Juggernog. In front of the Operations bunker's entrance, the bottle lies on the ground, on the water.

- The last bottle is at the Supply Depot, on a shelf in front of the entrance.

Side easter egg - Secret song 2
The second secret music is Ace of Spades from Motörhead. This music is played during the map's intro.
https://www.youtube.com/watch?v=1iwC2QljLn4
You need to activate ... well, three ace of spades cards.
- The first one is located on a blackboard, just besides Double-Tap, in the tank factory.

- The second one is located on a desk, in the first floor of the Dragon Command building, just next to a mystery box spot and a bomb.

- The last one is in the Hatchery, on a desk on the right of the Pack-a-Punch.

Side easter egg - Speed trial
If you complete the Main easter egg ( Mechanized Mourning), you will receive all 9 perks.
But if you complete it in under 1h30, you will have the perks and if you fall and get back up, you will keep them !
You will just loose Quick Revive in solo but don't worry. Head to a Wunderfizz and buy a perk. You will 100% receive Quick' and you can buy it for ever :D !
Side easter egg - Time trials
On Gorod Krovi you may have noticed that a timer displays the time of your game since last round or even when you've completed the main easter egg.
This is not just a gameplay feature, as there are 4 secret melee weapons that you can unlock. You have to complete specific amount of rounds in a certain period of time.
If done in time, a message should tell you you succeeded. You can now pick up a melee weapon in the operation bunker near a sign.


The melee weapon replaces a normal weapon, it is not replacing your normal knife.
To be easier you should not open doors at the beginning( for the two first trials at least) and use gobblegums to pack a punch guns from the walls. You can also use perkaholic or dead of nuclear winter.
These challenges are independant, you can fail the first and still succeed the next one.
- The first one is the wrench, to have it you need to complete round 5 in under 5 minutes. (Completing round 5 means you have to hit round 6). It one shot zombies until round 10.
- The second one is the Malice. You must complete round 10 under 13 minutes. The malice one shot zombies until round 15
- The third one is Slash N'burn from multiplayer. To obtain this axe you must complete round 15 in less than 24 minutes. It will one shot until round 25.
- The last melee weapon is the Fury's song sword. You need to complete round 20 under 32 minutes. It will one shot until round 35.
This way, you should also have earned the achievement Time Attack.


Achievements
Blown Away:

Difficulty: Easy
Simply craft the shield (See corresponding part above), train around until you stacked 10 zombies and blow them up.
Fire Mission:

Easy
Craft the dragon strike controller (See corresponding part above), train around for a couple of seconds and use the strike.
Love and War:

Hardest
Complete the main easter egg by killing Nikolaï 1.0. You can do it solo, 2, 3 or 4 players. (See corresponding parts above)
Not One Inch:

Easy
Head to the pack-a-punch and complete the Lockdown event. (Very similar to Fire Mission achievement)
Taking Flight:

Easy
Simply get to the pack-a-punch area.
Time Attack:

Hard
(See corresponding part above) You must reach round 20 in under 32 minutes. You can freely abue gobblegums like Bombs, DeathMachines, PaP-ed Weapons from the wall, etc ...
Vaporeyzed:

Easy
Train around until you've got 20 zombies or so behind you and head to a Gigant's laser beam trap. There is one in the Tank station or in the Supply depot. You can also activate the ray and stay afk in it, with your shield equipped.
Viktorious Revenge:

Average
Complete your trials in a solo game. (See corresponding part above)
Wield a Fist of Iron:

Average
Get the egg, incubate it, kill zombies and grab the gauntlet. ((See Gauntlet of Siegfried part above))
Zombiepult:

Difficulty: Easy
Train around until you've got a whole bunch of zombies, then head to the dragon command's propulsor trap and use it. You should use a monkey bomb, a slowing shot of the GKz 45, a dragon strike, or even a Widow's wine grenade to freeze the zombie on the trap.
Update logs
Guide published !
22/08/16:Added "Achievements" section.
27/08/16:Added "Trials" section. We reached 1000 views. :)
01/10/2016:Added how to upgrade the Monkey bombs
20/07/2020:
Added a TL;DR Cheat sheet
Added Samantha Sorrow side easter egg. Also revamped the guide, updated and corrected a LOT of content nonsense and wrong english sentences. Should be okay now.
Ace of Spades Has Better Reach Cod Black Ops 3
Source: https://steamcommunity.com/sharedfiles/filedetails/?id=724585259